Tampilkan postingan dengan label Windows Store Apps. Tampilkan semua postingan

Kamis, 21 November 2013

Windows Store App : How to use Grid in XAML

Introduction

By-default a Grid element has one row and one column i.e. a single cell, any control placed inside the Grid will be placed in this cell. Lets see the below simple XAML code where a textbox is placed in the first row and first column. Programmer is not specifying here, but it have value of Grid.Row as well as Grid.Column property to zero.

<Grid Background="{StaticResource ApplicationPageBackgroundThemeBrush}">
        <TextBlock Text="Hello World" />
</Grid>

How to Insert multiple Rows and Columns in Grid

Step-1 : Create <Grid.RowDefinitions> and <Grid.ColumnDefinitions > inside the Grid.

  <Grid Background="{StaticResource ApplicationPageBackgroundThemeBrush}">
        <Grid.RowDefinitions>              
        </Grid.RowDefinitions>

        <Grid.ColumnDefinitions >             
        </Grid.ColumnDefinitions>

</Grid>
Step-2: Lets create Three rows and three columns, by adding three RowDefinition and ColumnDefinition child as in below code.

<GridBackground="{StaticResourceApplicationPageBackgroundThemeBrush}">
        <Grid.RowDefinitions>   
            <RowDefinitionHeight="150"/>
            <RowDefinitionHeight="Auto" />
            <RowDefinitionHeight="*" />
           
        </Grid.RowDefinitions>
        <Grid.ColumnDefinitions>          
            <ColumnDefinitionWidth="*" />
            <ColumnDefinitionWidth="*" />
            <ColumnDefinitionWidth="*" />
        </Grid.ColumnDefinitions>

</Grid>

Here we have three rows and three column. Every row contains height attribute and column contains width attribute.The first row's height, expressed as an integer value for a pixel count. In the second row's height, described by a literal "Auto" or you can say height will adjust according to the content which will placed inside the grid. In third row's height, described by the asterisk character(*)  means you can say the last row will take remaining space of the grid.

How to place controls in rows and columns 

Generally grid is used when we are placing elements in no. of rows and columns. Suppose we want to move control to the second row and second column. To do that we have to set the value of Grid.Row and Grid.Column attribute of the respective element. Review the following XAML:

<Grid Background="{StaticResource ApplicationPageBackgroundThemeBrush}">
        <Grid.RowDefinitions>   
            <RowDefinition Height="150"/>
            <RowDefinition Height="Auto" />
            <RowDefinition Height="*" />
           
        </Grid.RowDefinitions>
        <Grid.ColumnDefinitions >          
            <ColumnDefinition Width="*" />
            <ColumnDefinition Width="*" />
            <ColumnDefinition Width="*" />
        </Grid.ColumnDefinitions>
        <TextBlock x:Name="firstBlock" Text=" Hello World"Grid.Row="1" Grid.Column="1" />
    </Grid>

Look out the above code, i have set the value of Grid.Row and Grid.Column to 1 for textbox element. By this it will placed in the second row and second column.

Design view of the code

Grid row definition and column definition in xaml: Windows Store App

Here your snap simplifies relation between TextBlock and Grid. Lets take a simple theory to understand how to define TextBlock outside the Grid.RowDefinitions and Grid.ColumnDefinitions.

Suppose you have three fruits apple, grapes and orange now you want to place all of them in individual row and column. Then you can simply place these items in the specified rows and column using Grid.Row and Grid.Column attribute.

Selasa, 19 November 2013

How to change Application name in Windows Store Grid App

Introduction

In our previous article, we have studied about Windows Store Grid App. In this article we will learn about App.xaml file and their behaviors also take a simple example to change Application name.

Pre-requisite

  • You need windows 8 SDK
  • You need developer license

General Structure of App.xaml file

<Application
    x:Class="FirstGridApplication.App"
    xmlns="http://schemas.microsoft.com/winfx/2006/xaml/presentation"
    xmlns:x="http://schemas.microsoft.com/winfx/2006/xaml"
    xmlns:local="using:FirstGridApplication"
    xmlns:localData="using:FirstGridApplication.Data">

    <Application.Resources>
        <ResourceDictionary>
            <ResourceDictionary.MergedDictionaries>

                <!--
                    Styles that define common aspects of the platform look and feel
                    Required by Visual Studio project and item templates
                 -->
                <ResourceDictionary Source="Common/StandardStyles.xaml"/>
            </ResourceDictionary.MergedDictionaries>

            <!-- Application-specific resources -->

            <x:String x:Key="AppName">FirstGridApplication</x:String>
        </ResourceDictionary>
    </Application.Resources>

</Application>

If you want to change Application name in Grid App then you should go for  App.xaml file and change in markup as specified in below XAML code

 <x:String x:Key="AppName">FirstGridApplication</x:String>

First Output Page
How to change Application name in Windows Store Grid App

<x:String x:Key="AppName">My Application</x:String>

After change Output will become

How to change Application name in Windows Store Grid App


Senin, 18 November 2013

Getting Started with Windows Store Grid App (XAML)

Introduction

The Grid App is basically used for navigating between categories. User can search contents between categories for example, photo and video apps in Windows 8. In this article we will discuss basics about windows store Grid App. Lets start windows Store Grid Apps with some simple steps. Select  File->New Project->Windows Store Grid (XAML) under the "Windows Store" category.

Windows Store Grid(XAML)

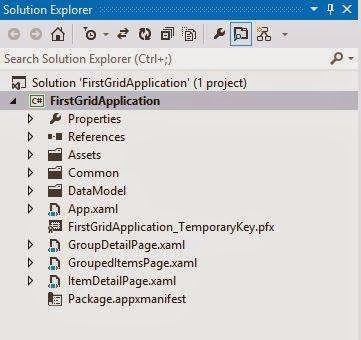
After selecting "OK" button you have successfully created windows Store Grid Application and by-default application page will be opened. This app contains many files shown in Solution Explorer:

Windows Store Grid App(XAML) : Solution explorer

The Grid App template includes these .xaml files:

App.xaml, where you can change your application name also provides markup for the content Host.
GroupedItemsPage.xaml, it is the first page of the application. It contains Application name, Group name, Item name with sub-title. It enables a user to select an item to navigate to the full-page item view, or to select a group label to navigate to the group details page.
GroupedItemsPage.xaml in windows store Grid App

GroupDetailPage.xaml, It shows Group name with short description and also item name with short description, and select an item to navigate to the full-page item view.
GroupDetailPage.xaml in windows store Grid Apps

ItemDetailPage.xaml, which is the full-page view for an item.
ItemDetailPage.xaml in windows store Grid Apps

Kamis, 14 November 2013

Windows Store : How to set Image Source in code file

Introduction

For setting Image Source in code file, you must use instance of the BitmapImage class. If your image source is a file referenced by URI, use the BitmapImage constructor that takes a URI parameter. If you want to set image using xaml then use Source attribute in <Image /> tag like.

<Image Source="Image/youtube.png" x:Name="Image1" HorizontalAlignment="Left" Height="221" VerticalAlignment="Top" Width="229"/>

Pre-requisite

  • Windows Phone 8 SDK (included in VS 2013)
  • Developer license
Windows Store : How to set Image Source in code file

Here you will see that your solution contains lots of file.  
  • MainPage.xaml - used to run our app
  • Package.appxmanifest - to describe your app and lists all the files your app contains
  • Image folder contains youtube.png file

Complete code


<Page
    x:Class="App4.MainPage"
    xmlns="http://schemas.microsoft.com/winfx/2006/xaml/presentation"
    xmlns:x="http://schemas.microsoft.com/winfx/2006/xaml"
    xmlns:local="using:App4"
    xmlns:d="http://schemas.microsoft.com/expression/blend/2008"
    xmlns:mc="http://schemas.openxmlformats.org/markup-compatibility/2006"
    mc:Ignorable="d">
    <Grid Background="{StaticResource ApplicationPageBackgroundThemeBrush}">
        <Image x:Name="Image1" HorizontalAlignment="Left" Height="221" VerticalAlignment="Top" Width="229"/>

    </Grid>
</Page>

Code file

using System;
using System.Collections.Generic;
using System.IO;
using System.Linq;
using Windows.Foundation;
using Windows.Foundation.Collections;
using Windows.UI.Xaml;
using Windows.UI.Xaml.Controls;
using Windows.UI.Xaml.Controls.Primitives;
using Windows.UI.Xaml.Data;
using Windows.UI.Xaml.Input;
using Windows.UI.Xaml.Media;
using Windows.UI.Xaml.Media.Imaging;
using Windows.UI.Xaml.Navigation;
// The Blank Page item template is documented at http://go.microsoft.com/fwlink/?LinkId=234238
namespace App4
{
    /// <summary>
    /// An empty page that can be used on its own or navigated to within a Frame.
    /// </summary>
    public sealed partial class MainPage : Page
    {
        public MainPage()
        {
            this.InitializeComponent();
            BitmapImage img = new BitmapImage();
            img.UriSource = new Uri(this.BaseUri,"Image/youtube.png");
            Image1.Source = img;          
        }
        /// <summary>
        /// Invoked when this page is about to be displayed in a Frame.
        /// </summary>
        /// <param name="e">Event data that describes how this page was reached.  The Parameter
        /// property is typically used to configure the page.</param>
        protected override void OnNavigatedTo(NavigationEventArgs e)
        {
        }
     
    }
}

Output


Windows Store : How to set Image Source in code file

Selasa, 12 November 2013

Windows Store:How to Add item in GridView

  1. Add a GridView control to a parent container using XAML code editor with name attribute.
<GridView x:Name="GridView1" >           

</GridView>

To assign a name to the grid view, set the x:Name attribute to a string value. To refer to a control in code, it must have a name. Otherwise, a name is not required.

2. Add items to the grid view by populating the Items collection or by binding the ItemsSource property to a data source.
 
<GridView x:Name="GridView1" > 
<x:String> name </x:String>
<x:String> City </x:String>          

</GridView>

Start Screen

Windows Store:How to Add item in GridView
 
Windows Store:How to Add item in GridView
 

Apply II method in code file

1. Create a List of String Items and bind with GridView control in main file constructor.
 

public MainPage()

{


this.InitializeComponent();

List<String> itemcoll = newList<String>();

itemcoll.Add("Apple");

itemcoll.Add("Mango");
itemcoll.Add("Orange");

GridView1.ItemsSource = itemcoll;

}


Senin, 19 Agustus 2013

Windows Store Apps : Write simple Hello world

Getting started with windows store
Step-1: Download windows 8 sdk from Microsoft website
http://msdn.microsoft.com/en-us/library/windows/desktop/hh852363.aspx

Step-2: Select Windows store Apps from file-->New-->Project-->Visual C# -->Windows store

start screen of Windows Store Apps : Write simple Hello world

Step-3: Select "MainPage.xaml" file in solution explorer.

You can make use of the TextBlock control for displaying Text on the screen.The TextBlock control has a property called Text that you can set to "Hello World" after press button.

Step-4: Paste this code into your "MainPage.xaml" file


<Page
x:Class="Helloworld.MainPage"
xmlns="http://schemas.microsoft.com/winfx/2006/xaml/presentation"
xmlns:x="http://schemas.microsoft.com/winfx/2006/xaml"
xmlns:local="using:Helloworld"
xmlns:d="http://schemas.microsoft.com/expression/blend/2008"
xmlns:mc="http://schemas.openxmlformats.org/markup-compatibility/2006"
mc:Ignorable="d">

<Grid Background="{StaticResource ApplicationPageBackgroundThemeBrush}">
<Button Content="Press Me" HorizontalAlignment="Left" Margin="94,76,0,0" VerticalAlignment="Top" Width="192" Height="71" Click="Button_Click_1"/>
<TextBlock x:Name="label1" HorizontalAlignment="Left" Margin="94,175,0,0" TextWrapping="Wrap" Text="" VerticalAlignment="Top" Height="85" Width="211"/>

</Grid>
</Page>
Codebehind file
using System;
using System.Collections.Generic;
using System.IO;
using System.Linq;
using Windows.Foundation;
using Windows.Foundation.Collections;
using Windows.UI.Xaml;
using Windows.UI.Xaml.Controls;
using Windows.UI.Xaml.Controls.Primitives;
using Windows.UI.Xaml.Data;
using Windows.UI.Xaml.Input;
using Windows.UI.Xaml.Media;
using Windows.UI.Xaml.Navigation;


// The Blank Page item template is documented at http://go.microsoft.com/fwlink/?LinkId=234238


namespace Helloworld


{
 
/// <summary>
/// An empty page that can be used on its own or navigated to within a Frame.
/// </summary>
public sealed partial class MainPage : Page


{
 
public MainPage()


{
 
this.InitializeComponent();


}
 
/// <summary>
/// Invoked when this page is about to be displayed in a Frame.
/// </summary>
/// <param name="e">Event data that describes how this page was reached. The Parameter
/// property is typically used to configure the page.</param>
protected override void OnNavigatedTo(NavigationEventArgs e)


{

}
 
private void Button_Click_1(object sender, RoutedEventArgs e)


{
 
label1.Text = "Hello world!";


}

}

}
 
 
Output
Windows Store Apps : Write simple Hello world