Senin, 30 September 2013

Change Text style of ListBox dynamically in ASP.NET

If you want to change text style of the Listbox control dynamically then you must use listbox property at runtime. such as

  ListBox1.Font.Size = 10;
Note : some property does not appear at runtime , those properties are:
overline,underline etc.


lets take an simple example:

<%@ Page Language="C#" AutoEventWireup="true" CodeFile="Default16.aspx.cs" Inherits="Default16" %>

<!DOCTYPE html PUBLIC "-//W3C//DTD XHTML 1.0 Transitional//EN" "http://www.w3.org/TR/xhtml1/DTD/xhtml1-transitional.dtd">

<html xmlns="http://www.w3.org/1999/xhtml">
<head runat="server">
    <title></title>
</head>
<body>
    <form id="form1" runat="server">
    <div>
        <asp:ListBox ID="ListBox1" runat="server" Font-Overline="True" Height="184px"
            Width="251px">
            <asp:ListItem>Apple </asp:ListItem>
            <asp:ListItem>Orange </asp:ListItem>
            <asp:ListItem>Mango</asp:ListItem>
            <asp:ListItem>Grapes</asp:ListItem>
        </asp:ListBox>
        <br />
        <br />
        <asp:Button ID="Button1" runat="server" onclick="Button1_Click"
            style="height: 26px" Text="Chnage text style" />
        <br />
    </div>
    </form>
</body>
</html>

Output
Change Text style of ListBox dynamically in ASP.NET

How to add new fields in CreateUserWizard in ASP.NET

Introduction

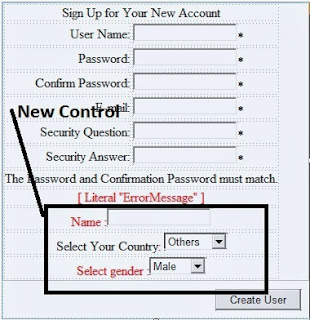
CreateUserWizard is the one of the most famous control for authenticating . Means if you want to store authenticated user information into your database then you can use CreateUserWizard control. Now at this time we will learn how to add new fields in CreateUserWizard control such as Name, Gender, Country etc.
follow some steps for doing this.
Step-1: Drop one CreateUserWizard control to the design page.
Step-2: Select Customize Create User Step link by ShowSmart tag.
How to add new fields in CreateUserWizard in ASP.NET

Step-3: Add new rows after last row also add some controls in the new add rows.
How to add new fields in CreateUserWizard in ASP.NET

Step-4: Handle CreatedUser Event of the  CreateUserWizard control.

protected void CreateUserWizard1_CreatedUser(object sender, EventArgs e)
    {
        ProfileCommon pc = (ProfileCommon)ProfileCommon.Create(CreateUserWizard1.UserName, true);
        pc.Country = ((DropDownList)CreateUserWizard1.CreateUserStep.ContentTemplateContainer.FindControl("DropDownList2")).SelectedValue;
        pc.Gender = ((DropDownList)CreateUserWizard1.CreateUserStep.ContentTemplateContainer.FindControl("DropDownList1")).SelectedValue;
        pc.Name = ((TextBox )CreateUserWizard1.CreateUserStep.ContentTemplateContainer.FindControl("name")).Text;
        pc.Save();
    
    }


According to microsoft ProfileCommon class create a AuthenticatedUser Profile instance using Create method. This class is inherited from ProfileBase class so first we declare a profile properties in web.config file.

<system.web>
    <anonymousIdentification enabled ="true"/>
    <profile>
      <properties >
        <add name="Name" type ="string"/>
        <add name ="Country" type ="string"/>
        <add name ="Gender" type ="String"/>

      </properties>


    </profile>
</system.web>

Run your Application
How to add new fields in CreateUserWizard in ASP.NETHow to add new fields in CreateUserWizard in ASP.NET


Change ListBox Width Dynamically in ASP.NET

Every control have a width property . In width property you can assign any unit value such as 10, 20 and any other number.If you want to change width of the control at runtime then you must assign width to the ListBox at runtime such as

ListBox1.Width = 20;

If you want to change control width according to listbox item then you must to change Item value to integer.
Lets take an simple example.

<%@ Page Language="C#" %>

<!DOCTYPE html PUBLIC "-//W3C//DTD XHTML 1.0 Transitional//EN" "http://www.w3.org/TR/xhtml1/DTD/xhtml1-transitional.dtd">

<script runat="server">

    protected void ListBox1_SelectedIndexChanged(object sender, EventArgs e)
    {
        ListBox1.Width =int.Parse(ListBox1.SelectedValue);
    }
</script>

<html xmlns="http://www.w3.org/1999/xhtml">
<head runat="server">
    <title></title>
</head>
<body>
    <form id="form1" runat="server">
    <div>
        <asp:ListBox ID="ListBox1" runat="server" AutoPostBack="True"
            onselectedindexchanged="ListBox1_SelectedIndexChanged">
            <asp:ListItem Value="100">Increase 100 pixel</asp:ListItem>
            <asp:ListItem Value="200">Increase 200 pixel</asp:ListItem>
        </asp:ListBox>
    </div>
    </form>
</body>
</html>


Output
Change ListBox Width Dynamically in ASP.NET

Change ListBox Width Dynamically in ASP.NET

Change Border Color dynamically in ASP.NET

There is two method for change border color of dropdownlist in asp.net . In first method you can use System.Drawing.Color.Blue enumeration for changing color.

DropDownList1.BorderColor = System.Drawing.Color.Red;
In Second method you can use DropDownList1.Attributes.Add() method.

DropDownList1.Attributes.Add("style", "value");

Lets take an simple example . Drop one dropdownlist control to the design page and handle  SelectedIndexChanged event.


<%@ Page Language="C#" %>

<!DOCTYPE html PUBLIC "-//W3C//DTD XHTML 1.0 Transitional//EN" "http://www.w3.org/TR/xhtml1/DTD/xhtml1-transitional.dtd">

<script runat="server">

    protected void DropDownList1_SelectedIndexChanged(object sender, EventArgs e)
    {
        DropDownList1.Attributes.Add("style", "border-color:" + DropDownList1.SelectedItem.Text);
        DropDownList1.BorderWidth = 5;
        DropDownList1.BorderStyle = BorderStyle.Dashed;
     
     
    }
</script>

<html xmlns="http://www.w3.org/1999/xhtml">
<head runat="server">
    <title></title>
</head>
<body>
    <form id="form1" runat="server">
    <div>
        <asp:DropDownList ID="DropDownList1" runat="server" AutoPostBack="True"
            Height="22px" onselectedindexchanged="DropDownList1_SelectedIndexChanged"
            Width="223px">
            <asp:ListItem>Red</asp:ListItem>
            <asp:ListItem>Green</asp:ListItem>
            <asp:ListItem>Black</asp:ListItem>
        </asp:DropDownList>
    </div>
    </form>
</body>
</html>

Output
Change Border Color dynamically in ASP.NET

Minggu, 29 September 2013

How to use Anchor property of control in windows form

Anchoring is one of the ways that WinForms provides for automatic layout control of your forms and the controls contained therein. By default, all controls are anchored to the upper-left, so that as the form is resized and moved, all controls are kept at their position relative to the upper-left corner of the form. However, in this case, we'd clearly like to have the text box controls widen or narrow as the form is resized. 

Without set right edge in anchor property

How to use Anchor property of control in windows form
Before Re-sizing

How to use Anchor property of control in windows form
After Re-sizing
To change the text boxes so that they anchor to the right edge as well as the top and left edges is a matter of clicking on the anchor rectangle on the right and changing the Anchor property to Top, Left, Right.

Set Top, Left and Right edge in anchor property

How to use Anchor property of control in windows form
Before Re-sizing
After set
How to use Anchor property of control in windows form

How to use Anchor property of control in windows form
After set re-sizing property

How to add Selected Item from ComboBox to ListBox in Windows form

Introduction

In my previous post we have been bind DropdownList using Complex datatype . Today we will learn how to add Selected Item from ComboBox to ListBox on button click event. follow some steps for add items to ListBox.

Step-1: Take a class file with some fields in the application.

using System;
using System.Collections.Generic;
using System.Linq;
using System.Text;

namespace CoffieShop
{
  
    class CoffieShop
    {
        public string Product_Name { get; set; }
        public decimal price { get; set; }

    }
}

Step-2: Drop a ComboBox control to the design window.
Step-3: Create a instance of the List class also bind list with the class.

namespace CoffieShop
{
    public partial class Form1 : Form
    {
        List<CoffieShop> item = new List<CoffieShop>();

}
}

Step-4:  Initiate class fields with some value and add to the List in Form_Load Event

 public Form1()
       {
           item.Add(new CoffieShop() { Product_Name = "pizza", price = 12.12M });
           item.Add(new CoffieShop() { Product_Name = "burger", price = 15.12M });
      
            InitializeComponent();
        } 
Step-5: Drop One Button Control to the Design window
Step-6: Add selected item from ComboBox to ListBox control on Button_Click Event
  private void button3_Click(object sender, EventArgs e)
        {
           var pro = comboBox1.SelectedItem as CoffieShop;
           listBox1.Items.Add(pro);
           listBox1.DisplayMember = "Product_Name";


        }
Complete code
using System;
using System.Collections.Generic;
using System.ComponentModel;
using System.Data;
using System.Drawing;
using System.Linq;
using System.Text;
using System.Windows.Forms;


namespace CoffieShop
{
    public partial class Form1 : Form
    {
        List<CoffieShop> item = new List<CoffieShop>();
   
        public Form1()
       {
           item.Add(new CoffieShop() { Product_Name = "pizza", price = 12.12M });
           item.Add(new CoffieShop() { Product_Name = "burger", price = 15.12M });


            InitializeComponent();
        }

        private void Form1_Load(object sender, EventArgs e)
        {
            comboBox1.DataSource = item;
            comboBox1.DisplayMember = "Product_Name";
        }

        private void button3_Click(object sender, EventArgs e)
        {
           var pro = comboBox1.SelectedItem as CoffieShop;
           listBox1.Items.Add(pro);
           listBox1.DisplayMember = "Product_Name";


        }
     
 
    }
}

Output
How to add Selected Item from ComboBox to ListBox in Windows form

How to Make TextBox Control ReadOnly: WPF

In our previous post, we have enable the spell check feature of the textbox, through which user can check the spellings of the word entered and correct it. As we know that the textbox is used to input any value by the user, but it can be used to display fix text on the screen.

To display fix text that cannot be edited by the user, we have to make the textbox read-only. The textbox have a property IsReadOnly, that is set to be true to enable this feature. Just write the following XAML code snippet:
<TextBox Width="300" Height="25" Margin="5"
Text="This is the correct line and you cannot edit it."
 IsReadOnly="True">
</TextBox>
Now run the code and a textbox will display with the above text written. The thing to check is, this textbox have its fix text and the user can not vary that text.

How to make read-only textbox in WPF XAML

So the read-only property is used to make the textbox read-only for the users. We can validate the input entered by the user by writing some line of code in our code part. We will validate the input in our next article.

Sabtu, 28 September 2013

Difference between Application.Run() and form.showDialog() method in windows form

class program {
  static void Main() {
    Form form = new Form();
    form.ShowDialog();
  }
}

This code would show a blank form and wait for the user to close it before returning control to the Main function, but it's not the code you will generally be writing. Instead, to make it accessible in other parts of your application, you'll be designating one form as the main form. To do this, pass the main form as an argument to the Run method of the Application object, which also resides in the System.Windows.Forms namespace

class program {
  static void Main() {
    Form form = new Form();
    Application.Run(form);
  }
}

The Application class's static Run method will show the main form, and when it's closed, Run will return, letting our Main function exit and closing the process.


ImageUrl Property of Hyperlink Control example

Example of ImageUrl Property

If you want to use image in place of Text on hyperlink control then you must specify the ImageUrl Property to the Hyperlink control. If you have been set ImageUrl then your Text will be hide because Image priority is high compare to text.

Lets take an example 


<%@ Page Language="C#" %>

<!DOCTYPE html PUBLIC "-//W3C//DTD XHTML 1.0 Transitional//EN" "http://www.w3.org/TR/xhtml1/DTD/xhtml1-transitional.dtd">

<script runat="server">

</script>

<html xmlns="http://www.w3.org/1999/xhtml">
<head runat="server">
    <title></title>
</head>
<body>
    <form id="form1" runat="server">
    <div>
        <asp:HyperLink ID="HyperLink1" runat="server" ImageUrl="~/submit.jpg"
            NavigateUrl="Http://www.google.com">HyperLink</asp:HyperLink>
    </div>
    </form>
</body>
</html>


Output
ImageUrl Property of Hyperlink Control example

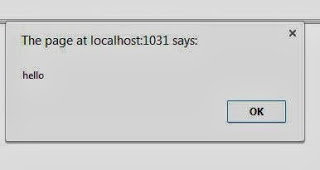
How to run javascript code on Label Text in ASP.NET

<%@ Page Language="C#" %>

<!DOCTYPE html PUBLIC "-//W3C//DTD XHTML 1.0 Transitional//EN" "http://www.w3.org/TR/xhtml1/DTD/xhtml1-transitional.dtd">

<script runat="server">

    protected void Page_Load(object sender, EventArgs e)
    {
 
     
    }
</script>

<html xmlns="http://www.w3.org/1999/xhtml">
<head runat="server">
    <title></title>
</head>
<body>
    <form id="form1" runat="server">
    <div>
        <asp:Label ID="Label1" runat="server" Text="JavaScript:<script>alert('hello');</script>"></asp:Label>
    </div>
    </form>
</body>
</html>

Output
How to run javascript code on Label Text in ASP.NET

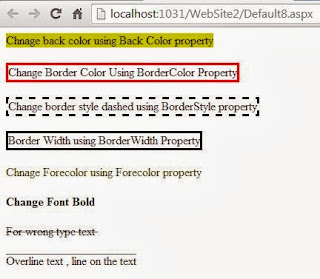
Formating on Label Control in ASP.NET

<%@ Page Language="C#" %>

<!DOCTYPE html PUBLIC "-//W3C//DTD XHTML 1.0 Transitional//EN" "http://www.w3.org/TR/xhtml1/DTD/xhtml1-transitional.dtd">

<script runat="server">

</script>

<html xmlns="http://www.w3.org/1999/xhtml">
<head runat="server">
    <title></title>
</head>
<body>
    <form id="form1" runat="server">
    <div>
 
        <asp:Label ID="Label1" runat="server" BackColor="#CCCC00"
            Text="Chnage back color using Back Color property"></asp:Label>
        <br />
        <br />
        <asp:Label ID="Label2" runat="server" BorderColor="Red" BorderStyle="Solid"
            Text="Change Border Color Using BorderColor Property"></asp:Label>
        <br />
        <br />
        <asp:Label ID="Label3" runat="server" BorderStyle="Dashed"
            Text="Change border style dashed using BorderStyle property"></asp:Label>
        <br />
        <br />
        <asp:Label ID="Label4" runat="server" BorderWidth="3px"
            Text="Border Width using BorderWidth Property"></asp:Label>
        <br />
        <br />
        <asp:Label ID="Label5" runat="server" ForeColor="#333300"
            Text="Chnage Forecolor using Forecolor property"></asp:Label>
        <br />
        <br />
        <asp:Label ID="Label6" runat="server" Font-Bold="True" Text="Change Font Bold"></asp:Label>
        <br />
        <br />
        <asp:Label ID="Label7" runat="server" Font-Strikeout="True"
            Text="For wrong type text "></asp:Label>
        <br />
        <br />
        <asp:Label ID="Label8" runat="server" Font-Overline="True"
            Text="Overline text , line on the text"></asp:Label>
        <br />
        <br />
 
    </div>
    </form>
</body>
</html>

Output
Formating on Label Control in ASP.NET

Jumat, 27 September 2013

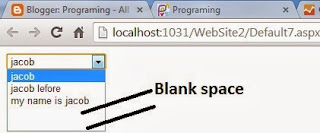
Bind DropdownList using structure in ASP.NET

<%@ Page Language="C#" AutoEventWireup="true" CodeFile="Default7.aspx.cs" Inherits="Default7" %>

<!DOCTYPE html PUBLIC "-//W3C//DTD XHTML 1.0 Transitional//EN" "http://www.w3.org/TR/xhtml1/DTD/xhtml1-transitional.dtd">

<html xmlns="http://www.w3.org/1999/xhtml">
<head runat="server">
    <title></title>
</head>
<body>
    <form id="form1" runat="server">
    <div>
        <asp:DropDownList ID="DropDownList1" runat="server">
        </asp:DropDownList>
    </div>
    </form>
</body>
</html>

Codebehind code

using System;
using System.Collections.Generic;
using System.Linq;
using System.Web;
using System.Web.UI;
using System.Web.UI.WebControls;

public partial class Default7 : System.Web.UI.Page
{
    struct student
    {
       public string name;
       public int age;
    }
    protected void Page_Load(object sender, EventArgs e)
    {
        student[] s1 = new student[5];
        s1[0].name = "jacob";
        s1[1].name = "jacob lefore";
        s1[2].name = "my name is jacob";


        foreach (student item in s1)
        {
            DropDownList1.Items.Add(item.name);   
        }


    }
}

Output
Bind DropdownList using structure in ASP.NET

How to use DropDownList Control in ASP.NET

<%@ Page Language="C#" %>

<!DOCTYPE html PUBLIC "-//W3C//DTD XHTML 1.0 Transitional//EN" "http://www.w3.org/TR/xhtml1/DTD/xhtml1-transitional.dtd">

<script runat="server">

    protected void Page_Load(object sender, EventArgs e)
    {
        DropDownList1.Items.Add("Apple");
        DropDownList1.Items.Add("mango");
        DropDownList1.Items.Add("orange");
     
    }

    protected void DropDownList1_SelectedIndexChanged(object sender, EventArgs e)
    {
        Label1.Text = "your selected item is <br/>" + DropDownList1.SelectedItem.Text;
    }
</script>

<html xmlns="http://www.w3.org/1999/xhtml">
<head runat="server">
    <title></title>
</head>
<body>
    <form id="form1" runat="server">
    <div>
        <asp:DropDownList ID="DropDownList1" runat="server" Height="20px"
            onselectedindexchanged="DropDownList1_SelectedIndexChanged" Width="186px"
            AutoPostBack="True">
        </asp:DropDownList><br />
        <asp:Label ID="Label1" runat="server" Text=""></asp:Label>
    </div>
    </form>
</body>
</html>

Output
Example of Add item to DropdownList in ASP.NET

Example of Add item to DropdownList in ASP.NET

<%@ Page Language="C#" %>

<!DOCTYPE html PUBLIC "-//W3C//DTD XHTML 1.0 Transitional//EN" "http://www.w3.org/TR/xhtml1/DTD/xhtml1-transitional.dtd">

<script runat="server">

    protected void Page_Load(object sender, EventArgs e)
    {
        DropDownList1.Items.Add("Apple");
        DropDownList1.Items.Add("mango");
        DropDownList1.Items.Add("orange");
     
    }

    protected void DropDownList1_SelectedIndexChanged(object sender, EventArgs e)
    {
        Label1.Text = "your selected item is <br/>" + DropDownList1.SelectedItem.Text;
    }
</script>

<html xmlns="http://www.w3.org/1999/xhtml">
<head runat="server">
    <title></title>
</head>
<body>
    <form id="form1" runat="server">
    <div>
        <asp:DropDownList ID="DropDownList1" runat="server" Height="20px"
            onselectedindexchanged="DropDownList1_SelectedIndexChanged" Width="186px"
            AutoPostBack="True">
        </asp:DropDownList><br />
        <asp:Label ID="Label1" runat="server" Text=""></asp:Label>
    </div>
    </form>
</body>
</html>

Output
Example of Add item to DropdownList in ASP.NET

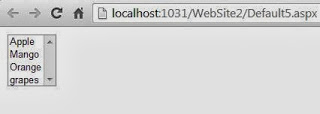
How to Bind ListBox using Complex DataType in ASP.NET

Step-1: Define class properties in class
Step-2: Create a List<DataType> object in code file.
Step-3: Add fields to the list.
Step-4: Bind ListBox with list
Step-5: Assign DataMember to the ListBox.


Create a class file in ASP.NET
using System;
using System.Collections.Generic;
using System.Linq;
using System.Web;

/// <summary>
/// Summary description for Fruits
/// </summary>
public class Fruits
{
    public string  Fruits_Name { get; set; }
    public decimal Fruits_price { get; set; }
 

Take a ListBox on Design window
<%@ Page Language="C#" AutoEventWireup="true" CodeFile="Default5.aspx.cs" Inherits="Default5" %>

<!DOCTYPE html PUBLIC "-//W3C//DTD XHTML 1.0 Transitional//EN" "http://www.w3.org/TR/xhtml1/DTD/xhtml1-transitional.dtd">

<html xmlns="http://www.w3.org/1999/xhtml">
<head runat="server">
    <title></title>
</head>
<body>
    <form id="form1" runat="server">
    <div>
        <asp:ListBox ID="ListBox1" runat="server"
            ></asp:ListBox>
    </div>
    </form>
</body>
</html>

Codebehind Code
using System;
using System.Collections.Generic;
using System.Linq;
using System.Web;
using System.Web.UI;
using System.Web.UI.WebControls;

public partial class Default5 : System.Web.UI.Page
{
    List<Fruits> listitem = new List<Fruits>();

    protected void Page_Load(object sender, EventArgs e)
    {
        listitem.Add(new Fruits() { Fruits_Name = "Apple", Fruits_price = 45.40M });
        listitem.Add(new Fruits() { Fruits_Name = "Mango", Fruits_price = 30.40M });
        listitem.Add(new Fruits() { Fruits_Name = "Orange", Fruits_price = 36.40M });
        listitem.Add(new Fruits() { Fruits_Name = "grapes", Fruits_price = 89.40M });
        ListBox1.DataSource = listitem;
        ListBox1.DataTextField = "Fruits_Name";
        ListBox1.DataBind();

    }
}

Output
How to Bind ListBox using Complex DataType in ASP.NET

Kamis, 26 September 2013

How to Bind DropDownList using Complex DataType in ASP.NET

Step-1: Define class properties in class
Step-2: Create a List<DataType> object in code file.
Step-3: Add fields to the list.
Step-4: Bind DropDownlist with list
Step-5: Assign DataMember to the DropDownList.


Create a class file in ASP.NET
using System;
using System.Collections.Generic;
using System.Linq;
using System.Web;

/// <summary>
/// Summary description for Fruits
/// </summary>
public class Fruits
{
    public string  Fruits_Name { get; set; }
    public decimal Fruits_price { get; set; }
 

Take a DropDownList on Design window
<%@ Page Language="C#" AutoEventWireup="true" CodeFile="Default5.aspx.cs" Inherits="Default5" %>

<!DOCTYPE html PUBLIC "-//W3C//DTD XHTML 1.0 Transitional//EN" "http://www.w3.org/TR/xhtml1/DTD/xhtml1-transitional.dtd">

<html xmlns="http://www.w3.org/1999/xhtml">
<head runat="server">
    <title></title>
</head>
<body>
    <form id="form1" runat="server">
    <div>
        <asp:DropDownList ID="DropDownList1" runat="server">
        </asp:DropDownList>
    </div>
    </form>
</body>
</html>

Codebehind Code
using System;
using System.Collections.Generic;
using System.Linq;
using System.Web;
using System.Web.UI;
using System.Web.UI.WebControls;

public partial class Default5 : System.Web.UI.Page
{
    List<Fruits> listitem = new List<Fruits>();

    protected void Page_Load(object sender, EventArgs e)
    {
        listitem.Add(new Fruits() { Fruits_Name = "Apple", Fruits_price = 45.40M });
        listitem.Add(new Fruits() { Fruits_Name = "Mango", Fruits_price = 30.40M });
        listitem.Add(new Fruits() { Fruits_Name = "Orange", Fruits_price = 36.40M });
        listitem.Add(new Fruits() { Fruits_Name = "grapes", Fruits_price = 89.40M });
        DropDownList1.DataSource = listitem;
       DropDownList1.DataTextField = "Fruits_Name";
        DropDownList1.DataBind();

    }
}

Output
How to Bind DropDownList using Complex DataType in ASP.NET

Rabu, 25 September 2013

How to Retrieve Data from SQL Database: Windows Forms

In my previous post, I have created a connection object and then get all the records from the database table. What if we want to bind our datagridview without writing a single line of code? So in this article we will do something like this.

Just drag-n-drop a datagridview on the form and name it, if you want. A datagridview tasks pop-up menu appears automatically as shown:

How to Retrieve Data From SQL Server Database and bind to DataGridView in Windows Forms

Select the Choose Data Source drop-down list and then Add Project Data Source as shown:

How to Retrieve Data From SQL Server Database and bind to DataGridView in Windows Forms

Now Data Source Configuration wizard will open, select Database as your data source. The wizard will look like:

How to Retrieve Data From SQL Server Database and bind to DataGridView in Windows Forms

By clicking on Next button, It will prompt for the database model you want to use. Select dataset, it will determines the type of data objects our application will use.

How to Retrieve Data From SQL Server Database and bind to DataGridView in Windows Forms

In the next step we have to choose our connection that is used by the application use to connect to the database.

How to Retrieve Data From SQL Server Database and bind to DataGridView in Windows Forms

Click on New Connection and it will prompt for Choose Data Source dialog box having some more options to select.

How to Retrieve Data From SQL Server Database and bind to DataGridView in Windows Forms

Select Microsoft SQL Server which is used to connect to MS SQL Server, and the data provider should be .NET Framework Data Provider for SQL Server. Add Connection dialog box will appear as shown:

How to Retrieve Data From SQL Server Database and bind to DataGridView in Windows Forms

Write the server name as given “(LocalDb)\v11.0”, and select appropriate database name from the drop down list below. I have select StockDb here. Just click on Test Connection to check our connection succeeded or not.

How to Retrieve Data From SQL Server Database and bind to DataGridView in Windows Forms

Press ok and it will show Data Source Configuration wizard again with the specified connection and also connection string.

How to Retrieve Data From SQL Server Database and bind to DataGridView in Windows Forms

Choose the table name from the tree view shown. I have select Groups table because I want to show the records of groups table. Finish now with selecting the data set name. If you will forget the dataset name, it will used the by default name.

How to Retrieve Data From SQL Server Database and bind to DataGridView in Windows Forms

It will show the datagridview binding with the columns names of groups table as shown in the above image. Now run the project and look out the records bind to the datagridview

How to Retrieve Data From SQL Server Database and bind to DataGridView in Windows Forms

As I have said above, we have not wrote a single line of code.

How to Enable Spell Check in TextBox: WPF

WPF Textbox control is used to input some value by the user at run time. Now it is not sure that the entered values are correct, it means user can write anything wrong in the textbox. So it is programmer’s job to check the value and correct it if wrong.

WPF textbox control provides a spell check functionality something same as MS Word. We have to use SpellCheck and Language property of the textbox. SpellCheck will enable the feature and language will decide the language in which spell check is to be performed.

<TextBox Width="300" Height="25" Margin="5"
Text="This si not teh correct line written by teh usre"
SpellCheck.IsEnabled="True" Language="En-Us">
</TextBox>

The code above will show a textbox with the given text. According to US English language, the textbox will place some red lines on the wrong words, as shown in the following image.

Enable SpellCheck in WPF Textbox Control


As in MS Word, when we right click on the wrong word, then it will show some help options in the context menu, as shown in the following image:

Show Context Menu in WPF Textbox control spell check

How to create user profile using Complex DataType in ASP.NET

User profile

A user profile is a collection of various properties that describes the information you want to store for a specific user. You can store the properties associated with a user in a user profile. The data that is stored in a profile can be accessed programmatically.
The profile feature in ASP.NET  allows you to define and store user-specific settings. In addition, a website can be more user friendly if it is customized according to the preferences of a user. For example, a shopping website displays the shopping cart that consists of the items that are frequently purchased by the user. To Induce such functionality, a website needs to retrieve and load the user’s data when the request for a Web page is made for the first time. After the request is completed, the current settings, such as the address and phone number of a user, must be stored on the server. Consequently, when  the same user request for the same Web page, the respective settings stored on the server corresponding to a user are retrieved.
The user’s profile is defined in the machine.config  or web.config file . The following Syntax of the web.config file contains the description of a user profile.
    <profile>
        <properties >
          <add name="Address" type ="string"/>
          <add name ="phone" type ="integer"/>
         
        </properties>      
       
       
      </profile>


The preceding syntax defines a profile by using properties in the web.config file. The <add> element defines the properties of a profile. The properties of a user profile consists of both simple data type and complex data types.

Lets take an Simple Example


Web.config file code

<system.web>
    <anonymousIdentification enabled ="true"/>
    <profile>
      <properties >
        <add name="name" type ="string" allowAnonymous ="true"/>
        <add name ="DOB" type ="dateofbirth" allowAnonymous ="true"/>

      </properties>


    </profile>
    <authentication mode="Forms" />
    <compilation debug="false" targetFramework="4.0" />

  </system.web>

Class File Code 

using System;
using System.Collections.Generic;
using System.Linq;
using System.Web;

/// <summary>
/// Summary description for dateofbirth
/// </summary>
public class dateofbirth
{ private string day;
        private string month;
        private string year;
        public string Day
        {
            get
            {
                return day;
            }
            set
            {
                day = value;

            }
        }
        public string Month
        {
            get
            {
                return month;
            }
            set
            {
                month = value;
            }
        }
        public string Year
        {
            get
            {
                return year;
            }
            set
            {
                year = value;
            }
        }
public dateofbirth()
{


}

}

Source code

<%@ Page Language="C#" %>

<!DOCTYPE html PUBLIC "-//W3C//DTD XHTML 1.0 Transitional//EN" "http://www.w3.org/TR/xhtml1/DTD/xhtml1-transitional.dtd">

<script runat="server">

    protected void Button1_Click(object sender, EventArgs e)
    {
        Profile .name =TextBox1 .Text ;
            Profile .DOB.Day=TextBox2 .Text ;
            Profile .DOB.Month =TextBox3 .Text ;
            Profile.DOB.Year = TextBox4.Text;
    }
</script>

<html xmlns="http://www.w3.org/1999/xhtml">
<head runat="server">
    <title></title>
</head>
<body>
    <form id="form1" runat="server">
    <div>Your DateOfBirth is
    <%= Profile.DOB .Day %>/
    <%= Profile .DOB .Month  %>/<%= Profile .DOB .Year %><br />
    Your Profile Name is
    <%=Profile .name %>
    </div>
    Enter Name:<asp:TextBox ID="TextBox1" runat="server"></asp:TextBox>

    <br />
    Enter Day:<asp:TextBox ID="TextBox2" runat="server"></asp:TextBox>

    <br />
    Enter Month: <asp:TextBox ID="TextBox3" runat="server"></asp:TextBox>

    <br />
    Enter Year : <asp:TextBox ID="TextBox4" runat="server"></asp:TextBox>

    <br />
    <asp:Button ID="Button1" runat="server" onclick="Button1_Click" Text="Submit" />
    <br />

    </form>
</body>

</html>


Output
How to create user profile using Complex DataType in ASP.NET

Instance of class cann’t access member of the class within the class

“Clubing data member and member function known as class.”

lets take an Example
Class A
{
Data member;
Member function;
}

If we create instance of the class in other class, that instance cannot access member of the class

lets take an Example

Class B
{
A  obj=new A();
A.Datamember;  // Error  instance member cann’t access datamember within the class
}

Solution :
Every executable statementmust be in a definition block( inside a function , constructor)
Class B
{
A obj =new A();
Public B()
{
Obj.DataMember=value; // you can access the datamember

}

Selasa, 24 September 2013

How to Use TextBox Control in WPF

The previous controls i.e. Label, TextBlock and etc. are used to display fix text in a window. Their text can be changed but through the programming, not by the user. Now to input some value by the user, or enable text editing, the text box control is used. The textbox control can contain only unformatted text in its text property.

<TextBox Width="200" Height=”25” Text="WPF Textbox control"></TextBox>

The above code will place a textbox control having width two hundred and above text in the textbox. The textbox is shown in the following image:

How to use Single line textbox in WPF XAML


In the above textbox only one line can be written, means we can’t either enter a new line in to the textbox or cant inset more lines by default. To enable multiline, it have two properties to do that i.e. TextWrapping and AcceptReturn. To insert a multiline textbox, write following code:

<TextBox Width="200" Height="40" Margin="5" Text="WPF Textbox control" TextWrapping="Wrap" AcceptsReturn="True"></TextBox>

Now when we run and write some more lines, then it will show something like this:

How to use Multiline textbox control in WPF XAML


In the next post we will enable spell check for this textbox control.

How to Apply style on control at runtime.

CSS introduction

CSS is a new web page layout method that has been added to HTML to give we developer more control over their desing and content layout. CSS allows a designer to create a standard set of commands(either embeded inside web page or from an external page) that controls the style of all subsequent pages.

With CSS you can add style (fonts , spacing, colors, size and links ) to web documents . Its more advanced techniques that controls the layout of the page without the use of tables or other cumbersome HTML.

 Lets take an simple example 


<%@ Page Language="C#" %>

<!DOCTYPE html PUBLIC "-//W3C//DTD XHTML 1.0 Transitional//EN" "http://www.w3.org/TR/xhtml1/DTD/xhtml1-transitional.dtd">

<script runat="server">

    protected void Button1_Click(object sender, EventArgs e)
    {
        BulletedList1.Style.Add(" background-color", "blue");
        BulletedList1.Style.Add(" font-size", "xx-large;");
    }
 
</script>

<html xmlns="http://www.w3.org/1999/xhtml">
<head runat="server">
    <title></title>
</head>
<body>
    <form id="form1" runat="server">
    <div>
        <asp:Button ID="Button1" runat="server" Text="Apply style"
            onclick="Button1_Click" Width="154px" />
        <asp:BulletedList ID="BulletedList1" runat="server">
            <asp:ListItem>Apple </asp:ListItem>
            <asp:ListItem>Mango</asp:ListItem>
            <asp:ListItem>Orange</asp:ListItem>
        </asp:BulletedList>
    </div>
    </form>
</body>
</html>

Output
How to Apply style on control at runtime.

How to access Html select tag in code file

HtmlSelect Class

The HtmlSelect class creates an HTML select control, which can display either a list box or a drop-down list box depending on its attribute. The items of the select control are stored in <option>elements inside the <select> element. As soon as you add a list box or drop-down list box to a Web form using HTML server controls, ASP.NET adds a default , empty <option> element to the <select> element. The HtmlSelect class gives you access to the HTML <select> element s in server code.

Properties of the HtmlSelect Class

DataMember  : Obtains or sets the set of data to bind to the HtmlSelect control from a DataSource with multiple sets of Data.
DataSource : Obtains or sets the source of information to bind to the HtmlSelect control.
DataSourceId : Obtains or sets the ID of the Data source control that the HtmlSelect control should use to retrieve its data source.
DataTextField : Obtains or sets the field from the data source to bind to the System.Web.UI.WebControls.ListItem.Text property of each item in the HtmlSelect control.
DataValueField : Obtains or sets the field from the data source to bind to the System.Web.UI.WebControls.ListItem.value property of each item in the HtmlSelect control.
InnerHtml : Obtains or sets the conect between the opening and closing tags of the control without automatically converting special characters to their equivalent HTMl entities.
Items : Obtains a collection that contains the item listed in an HtmlSelect control.
Multiple : Obtains or sets a value indicating whether multiple items can be selected concurrently in the HtmlSelect control.
Name : Obtains or sets the unique identifier name associated with the HtmlSelect control.
SelectedIndex : Obtains or sets the ordinal index of the selected item in an HtmlSelect control.
Size : Obtains or sets the height (in row ) of the HtmlSelect control.
Value : Obtains the value of the selected item in the HtmlSelect control or sets the SelectedIndex property of the control to the index of the first item in the list with the specified value.

Event of the HtmlSelect Class


ServerChange : Occurs when the select control is changed. You can handle this event on the server.

<%@ Page Language="C#" %>

<!DOCTYPE html PUBLIC "-//W3C//DTD XHTML 1.0 Transitional//EN" "http://www.w3.org/TR/xhtml1/DTD/xhtml1-transitional.dtd">

<script runat="server">
    protected void click_server(object server, EventArgs e)
    {
        sp1.InnerHtml = Select1.Value.ToString();
        int i = 0;
        for(i=0;i<Select1 .Items.Count;i++)
        {
            if (Select1 .Items [i].Selected)
            {
                sp2.InnerHtml += Select1.Value.ToString();
            }
        }
    }

</script>

<html xmlns="http://www.w3.org/1999/xhtml">
<head runat="server">
    <title></title>
</head>
<body>
    <form id="form1" runat="server">
    <div>
    Please Select Item : <br />
        <select id="Select1" runat ="server" >
            <option value ="Apple" selected ="selected">Apple</option>
            <option value ="Mango">Mango</option>
                   <option value ="Orange">Orange</option>
        </select>
        <span runat ="server" id="sp1">
        </span>
        <span runat ="server" id="sp2">
        </span>
        <input id="Submit1" type="submit" value="submit" runat ="server" onserverclick ="click_server" />
    </div>
    </form>
</body>
</html>

Output
How to access Html select tag in code file

How to access Html Image in code in ASP.NET

The HtmlImage class

The HtmlImage Class creates an HTML <img> element, which is used to display images on the web page. Using the properties of this class, you can change the image size and the image displayed as well as the alignment of the image with respect to other HTML elements. The HTML Image class gives you access to the HTML,<img> elements in server code.

Public Properties of the HtmlImage Class

Property
Description
Align
Obtains or sets the image’s alignment with respect to other HTML elements.
Alt
Obtains or sets the alternative text to display if an image cannot be displayed.
Border
Obtains or sets the width of the image’s border
Height
Obtains or sets the image’s height
Src
Obtains or sets the URL of the image
Width
Obtains or sets the image’s width

Lets take an Simple example
<%@ Page Language="C#" %>

<!DOCTYPE html PUBLIC "-//W3C//DTD XHTML 1.0 Transitional//EN" "http://www.w3.org/TR/xhtml1/DTD/xhtml1-transitional.dtd">

<script runat="server">
    protected void server_click(Object sender, EventArgs e)
    {
        first.InnerHtml = "Welcome Message";
       
    }
</script>

<html xmlns="http://www.w3.org/1999/xhtml">
<head runat="server">
    <title></title>
</head>
<body>
    <form id="form1" runat="server">
    <div>
 
        Access Html Image in Code page<br />
        <input type="image" runat ="server" src ="submit.jpg" id="image1" onserverclick ="server_click" />
        <div id="first" runat ="server">
        </div>
        <br />
 
    </div>
    </form>
</body>
</html>


Output
How to access Html Image in code in ASP.NET