Tampilkan postingan dengan label c#. Tampilkan semua postingan

Rabu, 08 Januari 2014

How to Create and Use of Iterators, yield: CSharp Programming

Programmer often use some type of iterators that are used to iterate steps in the programming language. An iterator often use yield keyword to return individual element, this is possible only if it have the current location in the cache.

C# Programming uses these iterators to execute some steps continuously like returning a value continuously from a method. Following program is creating an iterator in c# language.

public Form()
{
InitializeComponent();
foreach (int number in SomeNumbers())
{
string str = number.ToString() + " ";
}
}
public static System.Collections.IEnumerable SomeNumbers()
{
yield return 1;
yield return 2;
yield return 3;
}

Yield keyword keeps the current position of the currently executing statement, so that the iteration can be performed.

Here Foreach keyword is used for looping statements in c# programming language, but it is also used as iterators. Each time when the SomeNumbers() method is called in this loop, the yield keyword will return the specified number and will back to the current position.

That is why the resulting string in str variable will be "1 2 3". There may be many ways to creating iterators like:

Using Collection Class: As the well-known class collection is used to automatically called GetEnumerator method which returns IEnumerable type of data. The same process can be easily implemented using this collection class.

Using Generic List: As GetEnumerator method returns an array of specified elements. Generic method is inherited from IEnumerable interface. Using this method iterators can easily be implemented as in above program.

Selasa, 24 Desember 2013

How to Delete Multiple Records from DataGridView in Winforms: C#

To remove multiple records from the DataGridView, programmer need to write some line of code, code may be written in a button's click event that is outside of the DataGridView. The article shows about how to select multiple records of DataGridView and the c# code to remove them with a single mouse click.

When a programmer have to remove a single record entry from the DataGridView, then a command button can be added as discussed. Removing a single record can be performed by the index of the record. Through the index programmer can easily get all the unique values about the record which helps to perform the action.

To remove multiple records, follow the steps written below:
  • Drag-n-Drop DataGridView on the form and set its MultiSelect property to True.
  • Create a list of records (Student Class) and bind this DataGridView with that list.
  • Create a button outside of this DataGridView and generate its click event.
  • Write following C# code in the click event of button to remove multiple records:
private void removeButton_Click(object sender, EventArgs e)
{
DataContext dc = new DataContext();
foreach (var item in dataGridView1.Rows)
{
DataGridViewRow dr = item as DataGridViewRow;
if (dr.Selected)
{
string name = dr.Cells["Name"].Value.ToString();
var student = dc.Student.FirstOrDefault(a => a.Name.Equals(name));
if (student != null)
{
dc.Student.Remove(student);
}
}              
}
dataGridView1.DataSource = null;
dataGridView1.DataSource = dc.Student;
}
  • Run the form and select some of the records as in the image:
How to Delete Multiple Records from DataGridView in Winforms: C#

  • Click on the remove button and all these selected records will be deleted. A single record remain safe shown in the image:
How to Delete Multiple Records from DataGridView in Winforms: C#


So all these simple steps are used to delete multiple as well as single record from the DataGridView. Programmer can also use a confirmation message for the surety of the deletion by the user. To do that, just place all the above code in between the below c# code:

if (MessageBox.Show("Are you sure you want to remove all these records?", "Confirm", MessageBoxButtons.YesNo, MessageBoxIcon.Question).ToString() == "Yes")
{
//above code
}

When the programmer will click on the button then a confirmation message will be shown. After clicking on the "Yes" button, all the selected records will be deleted otherwise none of them.

Senin, 16 Desember 2013

Computer Programming : Nullable types, Null coalescing operator in c# Programming

In Computer Programming, C# Data types are divided into two broad categories such as Value types and Reference type. In Value types, some inbuilt types such as int, float, double, structs, enum etc. These all are non-nullable types, it means these types don't hold null value. In other hand Reference types such as string, Interface, Class, delegates, arrays etc. can hold null value.
By default value types are non nullable. To make them nullable use, programmer have to use ?
  • int a=0   a is non nullable, so a cannot be set to null, a=null will generate compiler error
  • int ?b=0  b is nullable int, so b=null is legal

Operator Need

If programmer want to assign null value to non-nullable data types then there are some operators explained with an example. 

Lets take an simple example

using System;
using System.Collections.Generic;
using System.Linq;
using System.Text;
namespace ConsoleApplication1
{
    class Program
    {
        static void Main(string[] args)
        {
            int a;
            int? b = 100;
            a = b ?? 0;
            System.Console.WriteLine(a);
            Console.ReadKey();
        }
    }
}
Computer Programming : Nullable types, Null coalescing operator in c# Programming

Output show that if b hold some value like 100 then Null coalescing operator assign value to variable (a). If b hold null value then Null coalescing operator assign default value, which is zero to variable a. 

Replace the declaration of variable b with the following line:
            int? b = Null;
This will outputs zero (default value).

Jumat, 13 Desember 2013

Computer Programming: Operators in c# console application

In computer programming, "operator" is used for perform operations between operands known as operator. Basically there are three types, unary operator , binary operator and ternary operator. In unary operator , we use single operand like (a++,a--), in binary operator we use two operands like ( a+b) and in ternary operator we use three operands like a>b?a:b

Assignment Operator (=)

if we create a variable of type integer also we want to initialize it with some value then we should use assignment operator like.

int a=10;

Here, variable a is initialized with value 10. It means you can say the right hand side value is copy to left hand side variable using assignment operator.

Arithmetic Operators ( +,-,*,/,%)

Basically arithmetic operators are used for doing mathematical calculation like addition of two or more numbers , multiplication, division, subtraction, and remainder. lets take a simple example to understand arithmetic operators. If the total collection by five students is five thousand then find the average value?.
int collected_money=5000;
int total_student =5;
int avg=collected_money/total_student;


Ternary operator (?, : )

In ternary operator we have three operands, in which first operand is used for check the condition and other two operands is used for giving results. Let’s take a simple example to understand the ternary operator.

Int firstnumber=10;
Bool result;
Result = firstnumber>10? True: false;

In the preceding example, if condition becomes true or you can say if firstnumber is greater than to 10 then ternary operator gives  ‘true’ in results otherwise gives ‘false’.
 

Comparison Operators (< , > ,<=,>=,!=,==)

using comparison operator you can perform Boolean operation between operands known as comparison operator. Lets take an simple to understand comparison operator
 
 class Program
    {
        static void Main(string[] args)
        {
            int a = 10;
            if (a==10)
            {
                Console.WriteLine(string.Format("The value of variable ={0}", a));
  
            }
            Console .ReadKey (false);
        }
    }
 
Computer Programming : Operators in c# console application Here, condition if check equality operation between operands, a and constant value 10. If condition becomes true, output comes "The value of variable=10".


  Logical operator (&&,|| )

Perform logical operation between Boolean operands known as logical operator. Lets take a simple example
 
  class Program
    {
        static void Main(string[] args)
        {
            bool a = true;
            bool b = true;
            if (a&&b)
            {
                Console.WriteLine("condition becomes true");
  
            }
            Console .ReadKey (false);
        }
    }
 

Jumat, 06 Desember 2013

Moving Records from a DataGridView to Another in C#: WinForms

Drag-n-Drop operation is an important action in the winforms application like our file explorer. This article will let you perform moving items from one datagridview to another, code is in c#. Follow the article and you will easily be able to do this task.

There are series of events that need to be handled to complete this task, discussed in moving items from one CheckedListBox to another. To perform this in datagridview we will use the pre-defined class Student with its properties like name, age and address.
  • Add two DataGridView control to the form (defaultDGV & newDGV) and place them in simple form as shown.

    Moving Records from a DataGridView to Another in C#: WinForms

  • Create two list of type Student class named stuList and newList.
    List<Student> stuList = new List<Student>();
    List<Student> newList = new List<Student>();
  • In the constructor add some records in the first list and bind that to first datagridview.
    public Form1()
    {
    InitializeComponent();
    stuList.Add(new Student() { Name = "Jacob", Age = 29, City = "London" });
    stuList.Add(new Student() { Name = "Zulia", Age = 31, City = "London" });
    stuList.Add(new Student() { Name = "Brandon", Age = 35, City = "London" });
    defaultDGV.DataSource = stuList;
    }
  • Generate MouseDown event of the defaultDGV datagridview and write following code:
    if (defaultDGV.SelectedRows.Count == 1)
    {
    if (e.Button == MouseButtons.Left)
    {
    DataGridView.HitTestInfo info = defaultDGV.HitTest(e.X, e.Y);
    if (info.RowIndex >= 0)
    {
    string name = defaultDGV.Rows[info.RowIndex].Cells["Name"].Value.ToString();
    defaultDGV.DoDragDrop(name, DragDropEffects.Move);
    }
    }
    }
In above code, we have to write code only when any of the row is selected and left mouse button is pressed. HitTestInfo class is used to get information of the specific row at given coordinates. After that get your desired cell value if the row index is greater than zero. DoDragDrop() method will set the value to be dragged.

  • Generate DragEnter and DragDrop events of another datagridview i.e. newDGV and make them same as written with following c# code.
    private void newDGV_DragEnter(object sender, DragEventArgs e)
    {
    e.Effect = DragDropEffects.Move;
    }

    private void newDGV_DragDrop(object sender, DragEventArgs e)
    {
    if (e.Data.GetDataPresent(typeof(string)))
    {
    string str = (string)e.Data.GetData(typeof(string));
    var record = stuList.FirstOrDefault(a => a.Name.Equals(str));
    stuList.Remove(record);
    newList.Add(record);
    defaultDGV.DataSource = newDGV.DataSource = null;
    defaultDGV.DataSource = stuList;
    newDGV.DataSource = newList;
    }
    }
You better known about the events used above. At the last, in DragDrop event remove the selected record from stuList and add that in newList. And then bind both lists to respective datagridview.

Run the project, defaultDGV have three rows added above, perform your drag-n-drop operation, it will successfully move the record.

Moving Records from a DataGridView to Another in C#: WinForms

Moving Records from a DataGridView to Another in C#: WinForms


Jumat, 29 November 2013

Windows 8 App Development: How to use HyperlinkButton in c# code file

In my previous article, i have discuss hyperlinkbutton with XAML code in windows 8 app development. In this article i will explain use this button in c# code file. Write the below code in specified file:

XAML CODE

<Page
    x:Class="App4.MainPage"
    xmlns="http://schemas.microsoft.com/winfx/2006/xaml/presentation"
    xmlns:x="http://schemas.microsoft.com/winfx/2006/xaml"
    xmlns:local="using:App4"
    xmlns:d="http://schemas.microsoft.com/expression/blend/2008"
    xmlns:mc="http://schemas.openxmlformats.org/markup-compatibility/2006"
    mc:Ignorable="d">

    <Grid Background="{StaticResource ApplicationPageBackgroundThemeBrush}">
     
<HyperlinkButton x:Name="h1" Height="200" Width="257" Content="Microsoft Development Network" Margin="90,20,0,548" Click="h1_Click" />
    </Grid>
</Page>

CODE FILE
using System;
using System.Collections.Generic;
using System.IO;
using System.Linq;
using Windows.Foundation;
using Windows.Foundation.Collections;
using Windows.UI.Xaml;
using Windows.UI.Xaml.Controls;
using Windows.UI.Xaml.Controls.Primitives;
using Windows.UI.Xaml.Data;
using Windows.UI.Xaml.Input;
using Windows.UI.Xaml.Media;
using Windows.UI.Xaml.Media.Imaging;
using Windows.UI.Xaml.Navigation;

// The Blank Page item template is documented at http://go.microsoft.com/fwlink/?LinkId=234238

namespace App4
{
    /// <summary>
    /// An empty page that can be used on its own or navigated to within a Frame.
    /// </summary>
    public sealed partial class MainPage : Page
    {
        public MainPage()
        {
            this.InitializeComponent();
            //BitmapImage img = new BitmapImage();
            //img.UriSource = new Uri(this.BaseUri,"Image/youtube.png");

            //Image1.Source = img;
            List<string> lit = new List<string>();
            lit.Add("Apple");
            lit.Add("Apple");
            lit.Add("Apple");
            lit.Add("Apple");
            //l1.ItemsSource = lit;           
        }

        private void h1_Click(object sender, RoutedEventArgs e)
        {
            Uri uri = new Uri("http://www.msdn.microsoft.com");
            h1.NavigateUri = uri;            
        }    
    }
}
In the above c# code, look out the click event of hyperlinkbutton h1, i have created an object of Uri class with the link as a constructor's parameter. And then set the property NavigateUri  to the object defined above. When user will click on this button, it will redirect programmer to the specified page.

OUTPUT
Windows 8 App Development: How to use HyperlinkButton in c# code file

Windows 8 App Development: How to use HyperlinkButton in c# code file

First image shown the hyperlinkbutton created by the c# code, when programmer will click on that button, it will redirect on the msdn page, shown in the second image. The second image shows the latest feature in windows 8 app development as it is redirecting programmer and both the pages are side by side.

Rabu, 20 November 2013

How to Implement Custom Control, Currency TextBox: Windows Forms

Currency Textbox, custom control, as the name implies, will accept only numbers, decimals and control characters. None of other type will be allowed in this textbox. This textbox is basically used to input prices, rates or any measurement including precision.

I have discussed about all the events used to create custom textbox. Open your Visual Studio 2013 Windows Forms project and add a new class named “CurrencyTextBox”, inherit this by System.Windows.Forms.TextBox. Go through the following points, they all together will make this textbox:

Property

Property will be used to get or set the value in the textbox.
private decimal currencyValue;
public decimal CurrencyValue
        {
            get { return currencyValue; }
            set { currencyValue = value; }
        }

Constructor

When the object of this class has been created, by-default it’s value is set to zero, as written in the below c# code.
public CurrencyTextBox()
        {
            currencyValue = 0;
        }

OnKeyPress

What is to be allowed to write in the textbox? Decided in this event. The first line is used to call its base class constructor with specified arguments. After this I have used some if conditions to specify which key is to be accepted or which is not. “e.Handled=true” this line is used to stop the character from being entered into the textbox.
protected override void OnKeyPress(KeyPressEventArgs e)
        {
            base.OnKeyPress(e);
            if (!Char.IsDigit(e.KeyChar) && !Char.IsControl(e.KeyChar) && e.KeyChar != '.')
            {
                e.Handled = true;
            }
            if (e.KeyChar == '.' && this.Text.Contains("."))
            {
                e.Handled = true;
            }
            if (e.KeyChar == '.' && this.Text.Length < 1)
            {
                e.Handled = true;
            }
        }

OnValidated

When the focus is changed, this event will convert the entered value into decimal value. Because currency is used in decimal not string.
protected override void OnValidated(EventArgs e)
        {
            Decimal value = Convert.ToDecimal(this.Text);
            this.Text = value.ToString("C");
        }

OnClick

When the user click on the textbox, it will set the text to currencyValue (property value) and the cursor will be placed at the last of input value.
protected override void OnClick(EventArgs e)
        {
            this.Text = currencyValue.ToString();
            if (this.Text == "0")
                this.Clear();
            this.SelectionStart = this.Text.Length;
        }

OnTextChanged

Change the newly entered value into decimal format.
protected override void OnTextChanged(EventArgs e)
        {
            currencyValue = Convert.ToDecimal(this.Text);
        }

Run your project and in the toolbox a node is added named components followed by project name. You can use this textbox in your project as per your requirements.

Download CurrencyTextBox.cs

Selasa, 19 November 2013

Steps and Events Used to Create Custom Control in C#: Windows Forms

In my previous article I have explained what is Custom Control, its types and features in brief. In this article I will write some steps to create the custom control, and will create a currency textbox control that will accept only currency type value.

Steps to create Custom control


  • Open your windows forms project, and create a class. Name of class will be the control’s name, you want to create.
  • Define a property, type should be respective to the value stored e.g. decimal, string, int etc.
  • Override some of the required methods like onClick, onKeyPressed, onTextChanged and OnValidated in the sense of textbox, including the constructor (discussed later).
  • Build the project and the control will added in to your toolbox window.

As I said that to make a custom control we have to override some required events of the base class. Here below I am writing about the methods, required to make a custom textbox.

OnKeyPress: this event occurs when user pressed a key while the respective control have focus. It passes the current value, the control have. When we override this event it has the following Syntax:

protected override void OnKeyPress(KeyPressEventArgs e)
{
//your code
}

OnValidated: Occurs when the respective control is validating. When user change the focus by using keyboard, or any other way, this validating event will occur. Following syntax will be used to override this event.

protected override void OnValidated(EventArgs e)
{
//your code
}

OnClick: Raises when the user click on the control. Contains the function is to be executed, when user click on the control. Syntax:

protected override void OnClick(EventArgs e)
{
//your code
}

OnTextChanged: Occurs when the user change the text of the control. Contains the code to be executed, when user change the text of the control. Syntax:

protected override void OnTextChanged(EventArgs e)
{
//your code
}

In the next, we will create a currency TextBox, that will only accept the currency related value like decimal, control characters.

Make your own Custom CurrencyTextBox

Senin, 18 November 2013

How to Develop your Own Custom Controls in C#

Custom control, the control with combined features of other controls, can be developed by any programmer easily. A custom control will not only be usable in the same application, but also it can be used in any other application that may be on other system. This designed control can be easily embedded in other applications.

Custom control have some basic features as well as some functionality that may be known by the programmer:
  • Improves encapsulation.
  • Simplifying a programming model.
  • Can swap out a control with another one.
  • Combines UI elements in a simple way.
  • Using these controls programmer can develop unique controls.

Types

User Control: combines other controls in a logical unit. Inherit from System.Windows.Forms.UserControl class.

Inherited controls: developed by an existing .NET control that is as close as you want to develop. We have to create a custom class and inherit an existing abstract class that is close to what we are developing.

Owner-drawn controls: inherit from a base class like System.Windows.Forms.Control. These controls provides most customizable UI.

Extender providers: These are used to add features to other controls on a form, means these are not necessarily at all.

These controls may be used in our other applications and it reduces the amount of code and the code duplication. It also helps in modularize your code. In the next article we will explain about the steps to create a custom control and also about the events, need to override to create custom textbox.

Jumat, 15 November 2013

How to Remove Record Entry in DataGridView by Command Button: Windows Form

Binding datagridview only is not sufficient for a programmer, he/she need to be known about how to remove unnecessary records from the list. For that we have to first bind our list of item to datagridview and then add a command button with text “Remove” as discussed in earlier post.

To remove an entry, either we have to find out the record’s unique detail or the index of the record in temporary list of items. Because we are binding the datagridview with the temporary list, that’s why we can remove this record using only the index of the record.

Bind a datagridview with the list of items and then add a command button with the text property to “Remove”. Our main motive in this article here is to access the command column, we have discussed earlier. So generate the Cell_Click event of datagridview and write the following c# code:
if (e.ColumnIndex == 0)
{
stuList.RemoveAt(e.RowIndex);
dataGridView1.DataSource = null;
dataGridView1.DataSource = stuList;
}
Run the form and click on remove button of any row you want to delete. And it will remove that record from the list only.
Form having all the rows:
How to Remove Record Entry in DataGridView by Command Button: Windows Form

Form after deleting the last row, it will show only two records.

How to Remove Record Entry in DataGridView by Command Button: Windows Form

Suppose, the user don’t want to remove, and by mistake he/she has clicked on the button then what? We have to use a confirmation message, record will be deleted only when user presses “Yes” and do nothing if user clicked on “No”. Write the following code replacing above code:
if (e.ColumnIndex == 0)
{
DialogResult result = MessageBox.Show("Sure Delete!", "Confirmation", MessageBoxButtons.YesNo);
if (result==DialogResult.Yes)
{
stuList.RemoveAt(e.RowIndex);
dataGridView1.DataSource = null;
dataGridView1.DataSource = stuList;
}
}
Run the code, it will show a confirmation message box as below. If you click on “Yes” it will delete it, and if you click on “No” it will do nothing. You can change the code as per your requirements.

Passing value through Public Property: Windows Forms

As in earlier article, we have passed a string value from one windows form to another, using the constructor function in C# language. In this article we will pass the same string value by a public property in the called form i.e. second windows form here.

1. Add two windows form in your project i.e. Form1 and Form2, according to standard names.
2. Drag-n-drop one textbox and one button on each of the form.
3. Generate click event of both of the buttons individually.
4. In Form2.cs file create a public property of type string named value (name may be changed).
5. Form2 class in form2.cs file have to be look like below c# code:
public partial class Form2 : Form
{
public string Value { get; set; }
public Form2()
{
InitializeComponent();
}

private void button1_Click(object sender, EventArgs e)
{
Value = textBox1.Text;
this.Close();
}
}
This code will assign the textbox1’s value to the public property “Value”, and close this form, when the user will click on button1.
6. Now on the form1 the click event of button1 will look like the following c# code:
private void button1_Click(object sender, EventArgs e)
{
Form2 form2 = new Form2();
form2.ShowDialog();
textBox1.Text = form2.Value;
}
In this code it will create an object of form2 and show that form as a modal dialog box. Enter any value in the textbox of form2, and click on the button, and your value is passed in form1.

For example I have entered “Passed value” in the textbox and after closing the form, form1’s textbox have the same value. Check out the images shown below:

1. When we run the project, the textbox is empty. Just click on the button, it will show form2.

Passing value through Public Property: Windows Forms

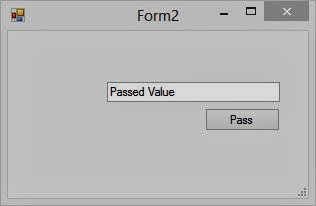
2. Write anything you want to send to previous form, I have written “Passed Value”. And click on the “pass” button.
Passing value through Public Property: Windows Forms

3. The previous form will bring to front and the textbox have the same value you write, “Passed Value” here.

Passing value through Public Property: Windows Forms

In above steps, we have passed string type of value, the type may be changed as int, float, double or any object of a class. Array can also be passed using the same procedure, replace the string from the array you want to pass.

How to pass value using Constructor

Rabu, 13 November 2013

How to use BackgroundWorker control in windows form c#

Introduction

In this example we will learn about BackgroundWorker control with their properties and events. Background worker is normally used where you want to run some operations on separate thread. As the name indicate "BackgroundWorker" means you can run your background thread simultaneously with your Application.

Some useful Public Properties of Background worker class are:

WorkerReportsProgress :  you can retrieve or set the value in WorkerReportProgress. That value indicates whether the BackgroundWorker can report progress updates. This property is capable of indicating to the rest of the application as well as executes.
     
WorkerSupportsCancellation : You can cancel your update asynchronously using set true to WorkerSupportCancellation property.

Lets take an simple example

Step-1 : Add some controls (two button control, one progress Bar and one Background Worker control) on forms.

two button control, one progressBar and one BackgroundWorker control

Step-2 : Set both WorkerReportProgress and WorkerSupportCancellation property to true.
Step-3 : Handle some events (Button_click, backgroundWorker1_DoWork, ProgressChanged, RunWorkerCompleted) which are related to Button and BackgroundWorker.
Step-4 : Write the below code in .cs file


using System;

using System.Collections.Generic;

using System.ComponentModel;

using System.Data;

using System.Drawing;

using System.Linq;

using System.Text;

using System.Threading.Tasks;

using System.Windows.Forms;


namespace WindowsFormsApplication1

{

    public partial class Form1 : Form

    {

        public Form1()

        {

            InitializeComponent();

        }


        private void backgroundWorker1_DoWork(object sender, DoWorkEventArgs e)

        {

            int count = (int)e.Argument;

            int sum = 0;

            for (int i = 1; i <=count; i++)

            {

                if (backgroundWorker1.CancellationPending)

                {

                    e.Cancel = true;

                    break;

                }

                sum += i;

                backgroundWorker1.ReportProgress(i * 100 / count);

                System.Threading.Thread.Sleep(500);


            }

            e.Result = sum;


        }


        private void backgroundWorker1_ProgressChanged(object sender, ProgressChangedEventArgse)

        {

            progressBar1.Value = e.ProgressPercentage;

        }


        private void backgroundWorker1_RunWorkerCompleted(object sender, RunWorkerCompletedEventArgse)

        {

            progressBar1.Value = 0;

            if (e.Cancelled)

            {

                MessageBox.Show("Cancel BackGroundWorker");

            }

            else

            {

                MessageBox.Show("Result:" + e.Result);

            }


        }


        private void button1_Click(object sender, EventArgs e)

        {

            backgroundWorker1.RunWorkerAsync(100);

        }


        private void button2_Click(object sender, EventArgs e)

        {

            progressBar1.Value = 0;

            backgroundWorker1.CancelAsync();

        }

    }

}

 
How to use Background control in windows form c#

How to use Background control in windows form c#

How to use Background control in windows form c#

Learn code in detail

Now RunWorkerAsync is the  method of BackgroundWorker compound directly call to DoWork event handler with 100 integer argument. In DoWork event handler count variable contains 100. Every iteration in "for" loop will check whether CancellationPending property is true or false (by-default) that means whether your cancel button is pressed or not. If your cancel button is pressed then CancelAsync() method of the BackgroundWorker will run and Your CancellationPending property is set to true.  

Minggu, 10 November 2013

How to set PictureBox Image using OpenFileDialog or Bitmap Class: WindowsForms

A person’s basic properties are name, age, date of birth, contact no. and also have a picture of that person. To insert the picture we have to preview that picture at the same time we are loading the picture. That’s why we need this picture box control on the windows forms.

Picture Box control is used to display pictures that may be jpeg, jpg, png or any bitmap file. The picture can be set during run time by the user, or can be fixed by the programmer during design time. It have many properties to be used by the programmer, to make the picture adjustable.

Picture box have some common properties that are mostly used by, which are:

  • SizeMode: used to control the clipping and positioning of the image in the display area.
  • ImageLocation: specify the image to be displayed.
  • ClientSize: used to change the size of the display area at run time.
  • BorderStyle: to distinguish the control from the rest of the form, even it have no image.

Drag-n-drop a picture box which will hold the image and button to be used to browse the image. The form will look like the image below:

How to set PictureBox Image using OpenFileDialog or Bitmap Class: WindowsForms

Generate the click event of button and write the following C# code:
OpenFileDialog ofd = new OpenFileDialog();
ofd.ShowDialog();
pictureBox1.ImageLocation = ofd.FileName;
pictureBox1.SizeMode = PictureBoxSizeMode.Zoom;

When you run this project and click on the button, it will show an openFileDialog box. You have to select an image file and click on OK button. At the last the picture has been set on the picture box as shown in the below image.

How to set PictureBox Image using OpenFileDialog or Bitmap Class: WindowsForms

It is not required to set the picture as above, we can set an object also of the Image class in the System.Drawing namespace. For that, just create an object of Bitmap class and set that object to the image property of picture box, as described in the below code:
Bitmap bt = new Bitmap(“image path”);
pictureBox1.Image = bt;
pictureBox1.SizeMode = PictureBoxSizeMode.Zoom;

The most thing to be noticed in the second code, is we have to know the exact path of the image file. Run the code and it will give the same output as the first code provide.

See Also: OpenFileDialog in windows forms

Sabtu, 09 November 2013

Attendance Management Project in Windows Forms with C#

Introduction

All the institutions are following almost the same procedure of storing the attendance of student i.e. registers or may be an excel file. When counting the attendances at the last they have to manually count for each student, or by insertion of some formula in excel file.

Attendance management project will simply provide all the common features, it should have. Through this project one can add new student, assign them attendances monthly and at the last a report can also be generated as a hard proof. The person, know the username and password, can only be permissible to use this software.

The solution have another class library project that is used to create the database using entity framework. Database has only two tables i.e. Attendance and Student, each have its own field.

Features of Project: 


  • Administrator can only login into the software.
  • User can add/modify student’s details as per the requirements.
  • Can search attendance according to either student name or roll no.
  • A report can be generated at the last as a proof for guardian/parents.

System Requirements:


  • Visual Studio 2010 or higher
  • SqlServer 2008 or higher
  • DotNet Framework 4.0 or higher (pre-loaded with Visual Studio)

Run the project:

It is a windows form application, so either press F5 or click on Start button. It will load the login window, which requires username and password. Username is “admin” and password is “password”, click on login button and the manage options window will be shown to you.

Download

mail me : narenkumar851@gmail.com for source code

Screenshots:

New Attendance: The form through which the user can add attendance according to the roll no.

Attendance Management Project in Windows Forms with C#

Attendance List: Let the user search the attendance according to the student name.
Attendance Management Project in Windows Forms with C#

Attendance via RollNo: User can count attendance via roll no of the student.

Attendance Management Project in Windows Forms with C#

Report Form: The form will show you how the report will look like, you can change this design using the report window.

Attendance Management Project in Windows Forms with C#