ASP PROGRAM : Introduction
The wizard control provides navigation and a User Interface (UI) to collect related data across multiple steps. It also allows you to implement liner or non-linear navigation through the steps such as skipping unnecessary steps or returning to a previously completed step to change some value. The appearance of the wizard control is fully customized by using templates , skins and style settings; for example , you can use the HeaderTemplate , SideBarTemplate, StartNavigationTemplate , FinishNavigationTemplate , and StepNavigationTemplate properties to customized the interface of the Wizard control.
Public Properties of the Wizard Class
ActiveStep : Obtains the step in the WizardSteps collection , which is currently displayed to the end-user
ActiveStepIndex : Obtains or sets the index value of the current WizardStepBase object.
CancelButtonImageUrl : Obtains or sets the URL of the image displayed for the cancel button.
CancelButtonStyle : Obtains a reference to a collection of style properties that describes the appearance of the cancel button .
CancelButtonText : Obtains or sets the text caption that is displayed for the cancel button.
CancelButtonType : Obtains or sets the type of button that is rendered as the cancel button.
CancelDestinationPageUrl : Obtains or sets the URL that the end user is directed to when they click the cancel button.
CellPadding : Obtains or sets the amount of space between the data of the cell and the cell border.
CellSpacing : Obtains or sets the space between the cells
DisplayCancelButton : Obtains or sets a boolean value showing whether to display a cancel button.
DisplaySideBar : Obtains or sets a Boolean value showing whether to display the sidebar area on the wizard control.
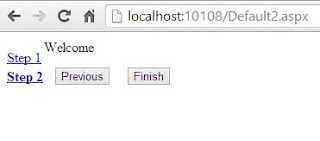
Output
The wizard control provides navigation and a User Interface (UI) to collect related data across multiple steps. It also allows you to implement liner or non-linear navigation through the steps such as skipping unnecessary steps or returning to a previously completed step to change some value. The appearance of the wizard control is fully customized by using templates , skins and style settings; for example , you can use the HeaderTemplate , SideBarTemplate, StartNavigationTemplate , FinishNavigationTemplate , and StepNavigationTemplate properties to customized the interface of the Wizard control.
Public Properties of the Wizard Class
ActiveStep : Obtains the step in the WizardSteps collection , which is currently displayed to the end-user
ActiveStepIndex : Obtains or sets the index value of the current WizardStepBase object.
CancelButtonImageUrl : Obtains or sets the URL of the image displayed for the cancel button.
CancelButtonStyle : Obtains a reference to a collection of style properties that describes the appearance of the cancel button .
CancelButtonText : Obtains or sets the text caption that is displayed for the cancel button.
CancelButtonType : Obtains or sets the type of button that is rendered as the cancel button.
CancelDestinationPageUrl : Obtains or sets the URL that the end user is directed to when they click the cancel button.
CellPadding : Obtains or sets the amount of space between the data of the cell and the cell border.
CellSpacing : Obtains or sets the space between the cells
DisplayCancelButton : Obtains or sets a boolean value showing whether to display a cancel button.
DisplaySideBar : Obtains or sets a Boolean value showing whether to display the sidebar area on the wizard control.
Example of Wizard Control
When you add a Wizard control on a Web page (Default.aspx), it adds the following code to the source code of the web page
<asp:Wizard ID="Wizard1" runat="server" ActiveStepIndex="0">
<WizardSteps>
<asp:WizardStep runat="server" title="Step 1">
</asp:WizardStep>
<asp:WizardStep runat="server" title="Step 2">
</asp:WizardStep>
</WizardSteps>
</asp:Wizard>
If you want to add some controls to the Wizard control then you must drop some controls between opening and closing tag of WizardStep
<asp:WizardStep runat="server" title="Step 1">
//Put some controls here
<asp:WizardStep runat="server" title="Step 1">
//Put some controls here
</asp:WizardStep>
<%@ Page Language="C#" %>
<!DOCTYPE html>
<script runat="server">
protected void Page_Load(object sender, EventArgs e)
{
}
protected void RadioButtonList1_SelectedIndexChanged(object sender, EventArgs e)
{
result.Text = "your gender are <br/>" + RadioButtonList1.SelectedItem.Text;
}
</script>
<html xmlns="http://www.w3.org/1999/xhtml">
<head runat="server">
<title></title>
</head>
<body>
<form id="form1" runat="server">
<div>
<asp:Wizard ID="Wizard1" runat="server" ActiveStepIndex="0">
<WizardSteps>
<asp:WizardStep runat="server" title="Step 1">
Your Gender are<br />
<asp:RadioButtonList ID="RadioButtonList1" runat="server" AutoPostBack="True" OnSelectedIndexChanged="RadioButtonList1_SelectedIndexChanged">
<asp:ListItem>Male</asp:ListItem>
<asp:ListItem>Female</asp:ListItem>
</asp:RadioButtonList>
<br />
<asp:Label ID="result" runat="server"></asp:Label>
</asp:WizardStep>
<asp:WizardStep runat="server" title="Step 2">
Welcome
</asp:WizardStep>
</WizardSteps>
</asp:Wizard>
</div>
</form>
</body>
</html>
Output


Tidak ada komentar:
Posting Komentar