Minggu, 19 Januari 2014

Tokens and its Types used in NetBeans: Java

In a passage of text, individual words and punctuation marks are called tokens. In fact, every unit that makes a sentence in Java programming is a token.
The smallest individual unit in a program is known as a Token.
Java has the following types of tokens:

Keywords

Keywords are the words that convey a special meaning to the language complier. These are reserved for special purpose and must not be used as normal identifier names.

The following character sequence, formed from ASCII letters, are reserved for use as keywords and cannot be used as identifiers:
Keywords and its Types used in NetBeans: Java
The keywords const and goto are reserved, even though they are not currently used. This may allow a Java complier to produce better error message if these Java keywords incorrectly appear in programs.

While true and false might appear to be keywords, they are technically Boolean literals. Similarly, while null might appear to be keywords, it is technically the null literal. Thus true, false and null are not keywords but reserved words.

Character Set used in NetBeans: Java Programming

Java programming have its own character set that is used by the programmers to write code easily. Character set is composed of valid characters in a language that may be any letter, digit etc.

In any language, there are some fundamentals that you need to know before you can write even the most elementary programs. This article introduce Java fundamentals to you so that you may start writing efficient code for your GUI applications.

Character set is a set of valid characters that a language can recognize. A character represent any letter, digit or any other sign. Java uses Unicode character set. Unicode is two-byte character code set that has character representing almost all character in almost all language and writing systems around the world including English, Arabic, Chinese and many more.

The first 128 character in the Unicode character set are identical to common ASCII character set. The second 128 characters are identical to the upper 128 characters of the ISOLaptin-1 extended SCII character set. Its next 65,280 that are capable of representing character of nearly all recognized of the world.

You can refer to a particular Unicode character by using the escape sequence \u followed by a four digit hexadecimal.
For example
\u00AE         ©       The copyright Symbol
\u0022          “        The double quote
\u00BD        ½        The fraction ½
\u0394        ∆         The capital Greek letter delta

You can even use the full Unicode character sequence to name your variables. However, chances are your text editor won’t be able to handle more than basic ASCII very well.

Sabtu, 18 Januari 2014

About the Folders in MVC Web Application in Visual Studio

In Visual Studio, when programmer creates a new MVC 4 Web Application some folders and files added by default. These folders contains Controllers, Models, and Views etc. to be complete MVC framework basis. The following figure shows the solution explorer created by default application:

MVC 4 Solution Explorer in Visual studio

App_Data

As the name implies, this folder will contains all the data related to our application. In further articles, we will use this folder to add a database (SQL database).

App_Start

All the files used to start the application are placed in this folder. These files contains AuthConfig, BundleConfig and RouteConfig etc. To specify routes for the application, add some files dynamically may be done by using these files.

Content

Content folder contains themes folder including css files, static files, icons and images used by the application. A default Site.css file is added in this folder that creates standard theme for the application. Programmer can change these themes as per the roles, account by using these folder.

Controllers

MVC gives all the controller the standard name suffix with “Controller”. The default mvc application have two controller i.e. AccountController and HomeController. These controller have some actions defined, used for redirection of the user. Programmer can add more controllers as per the requirements and any controller have multiple actions discussed later.

Models

Classes represents the application model for your application are defined in this folder. These classes may be used to create validation for the fields entered by the user. We will add some model classes in this folder in later article. It have default model added in the visual studio MVC application.

Views

Pages shown to the user, according to the controller classes are stored in this folder. Related views may be placed in a folder having the same name of controller by which these views relates. Any controller have some standard actions like Index, Create, Edit and Delete. The related views folder have all these views having the same name.
These views may have aspx or razor pages according to the requirement of the programmer.

Scripts

JavaScript files used by the application are stored in this folder. By default MVC add approx. 15 js files in the folder which are standard java script files. Programmer can also add some new files and use them in the application.

Kamis, 16 Januari 2014

How to search item from database using stored procedure in ASP.NET

Step-1: First create a Database Table in visual studio
I have some columns like

SNO    int      primarykey with auto increment by 1
Title      nvarchar(50)  Allow Null
MetaDescription  nvarchar(MAX)  Allow Null
URL   nvarchar(200) Allow Null

Step-2: Add TextBox, Button and GridView control into the .aspx page
Step-3: Create a static class for connection.
Step-4: Handle Button_click event

<p>
        Enter Text Here :
        <asp:TextBox ID="TextBox1" runat="server" Height="32px" Width="237px"></asp:TextBox>
    </p>
    <p>
        <asp:Button ID="Button1" runat="server" Height="33px" onclick="Button1_Click" 
            Text="Search" Width="122px" />
    </p>
    <p>
        <asp:GridView
         AutoGenerateColumns ="false"
          ID="GridView1" runat="server"
           Height="180px" Width="426px"
                        GridLines ="None" 
                                AllowPaging="True" 
            onpageindexchanging="GridView1_PageIndexChanging" PageSize="5" 
            ShowHeader="False">

           <Columns>
           <asp:TemplateField>
              <ItemTemplate>
                  <asp:HyperLink ID="HyperLink1" runat="server" Text ='<%# Eval("title") %>' NavigateUrl='<%# Eval("URL") %>'/>
                  <br />
                  <asp:Label ID="Label1" runat="server" Text='<%# Eval("title") %>'/><br />
               <asp:Label ID="description" runat="server" Text='<%# Eval("metaDescription") %>'/>
               <asp:Label ID="Label2" runat="server" Text='<%# Eval("keywords") %>'/>
              </ItemTemplate>
               
           </asp:TemplateField>
           
          
           </Columns>
        
        </asp:GridView>
    </p>
<p>
        &nbsp;</p>

.aspx.cs file

using System;
using System.Collections.Generic;
using System.Linq;
using System.Web;
using System.Web.UI;
using System.Web.UI.WebControls;
using System.Data.SqlClient;
using System.Configuration;
using System.Data;

public partial class _Default : System.Web.UI.Page
{
    SqlConnection con = new SqlConnection();
    SqlCommand cmd = new SqlCommand();
    DataSet ds = new DataSet();
        
    protected void Page_Load(object sender, EventArgs e)
    {

    }
    protected void Button1_Click(object sender, EventArgs e)
    {
        loadgrid();

    }

    private void loadgrid()
    {
        con.ConnectionString = connection.Connectionstring;
        con.Open();
        cmd.CommandText = "GetEngine";
        cmd.CommandType = CommandType.StoredProcedure;
        cmd.Parameters.AddWithValue("@parameter", TextBox1.Text);
        cmd.Connection = con;
        SqlDataAdapter da = new SqlDataAdapter(cmd);
        da.Fill(ds);
        GridView1.DataSource = ds;
        GridView1.DataBind();
    }
    protected void GridView1_PageIndexChanging(object sender, GridViewPageEventArgs e)
    {
        GridView1.PageIndex = e.NewPageIndex;
        loadgrid();
    }
}

Connection Class  file

using System;
using System.Collections.Generic;
using System.Linq;
using System.Web;
using System.Configuration;

/// <summary>
/// Summary description for connection
/// </summary>
public static class connection
{
    private static string DBConnectionString;
static connection()
{
        DBConnectionString = ConfigurationManager.ConnectionStrings["ConnectionString"].ToString();
}
    public static string Connectionstring
    {
        get
        {
            return DBConnectionString;
        }
    
    }
}

Stored Procedure code

Create Procedure GetEngine
@parameter nvarchar(100)
As
Select * from SearchEngine where Title like '%'+@parameter+'%' or MetaDescription like '%'+@parameter+'%' or  URL like '%'+@parameter+'%'


Code generate the following output

How to search item from database using stored procedure in ASP.NET

Rabu, 15 Januari 2014

Search Engine project with source code in ASP.NET

Introduction

Search engine means , you can search any item from the database. Basically a search engine depends on various algorithms. In this project we use simple search algorithm. That algorithm is
First you fill the table by some value like insert title, description, URL, keywords etc. After feeding the data you can search in it.

Software requirement of the project are

1. Visual Studio 2010 with sql server 2008

Download

mail to me : narenkumar851@gmail.com     for project source code

Designing patterns 

1. First prepare master page for outer structure.
2. Search item using TextBox from database also take output in Gridview.
3. Design Admin Login page for feeding data into database table.
4. Also set permission for admin (admin can remove item from database table)


Search Code using stored procedure

<%@ Page Title="Home Page" Language="C#" MasterPageFile="~/Site.master" AutoEventWireup="true"
    CodeFile="Default.aspx.cs" Inherits="_Default" %>

<asp:Content ID="HeaderContent" runat="server" ContentPlaceHolderID="HeadContent">
</asp:Content>
<asp:Content ID="BodyContent" runat="server" ContentPlaceHolderID="MainContent">
    <p>
        Enter Text Here :
        <asp:TextBox ID="TextBox1" runat="server" Height="32px" Width="237px"></asp:TextBox>
    </p>
    <p>
        <asp:Button ID="Button1" runat="server" Height="33px" onclick="Button1_Click" 
            Text="Search" Width="122px" />
    </p>
    <p>
        <asp:GridView
         AutoGenerateColumns ="false"
          ID="GridView1" runat="server"
           Height="180px" Width="426px" GridLines ="None" AllowPaging="True" 
            onpageindexchanging="GridView1_PageIndexChanging" PageSize="5" 
            ShowHeader="False">
           <Columns>
           <asp:TemplateField>
              <ItemTemplate>
                  <asp:HyperLink ID="HyperLink1" runat="server" Text ='<%# Eval("title") %>' NavigateUrl='<%# Eval("URL") %>'/>
                  <br />
                  <asp:Label ID="Label1" runat="server" Text='<%# Eval("title") %>'/><br />
               <asp:Label ID="description" runat="server" Text='<%# Eval("metaDescription") %>'/>
               <asp:Label ID="Label2" runat="server" Text='<%# Eval("keywords") %>'/>
              </ItemTemplate>
               
           </asp:TemplateField>
           
          
           </Columns>
        
        </asp:GridView>
    </p>
<p>
        &nbsp;</p>
</asp:Content>


Csharp File code

using System;
using System.Collections.Generic;
using System.Linq;
using System.Web;
using System.Web.UI;
using System.Web.UI.WebControls;
using System.Data.SqlClient;
using System.Configuration;
using System.Data;

public partial class _Default : System.Web.UI.Page
{
    SqlConnection con = new SqlConnection();
    SqlCommand cmd = new SqlCommand();
    DataSet ds = new DataSet();
     
    protected void Page_Load(object sender, EventArgs e)
    {

    }
    protected void Button1_Click(object sender, EventArgs e)
    {
        loadgrid();

    }

    private void loadgrid()
    {
        con.ConnectionString = connection.Connectionstring;
        con.Open();
        cmd.CommandText = "GetEngine";
        cmd.CommandType = CommandType.StoredProcedure;
        cmd.Parameters.AddWithValue("@parameter", TextBox1.Text);
        cmd.Connection = con;
        SqlDataAdapter da = new SqlDataAdapter(cmd);
        da.Fill(ds);
        GridView1.DataSource = ds;
        GridView1.DataBind();
    }
    protected void GridView1_PageIndexChanging(object sender, GridViewPageEventArgs e)
    {
        GridView1.PageIndex = e.NewPageIndex;
        loadgrid();
    }
}


Search Engine project with source code  in ASP.NET

Search Engine project with source code  in ASP.NET

Selasa, 14 Januari 2014

How to create and read Profile Group in ASP.NET

Step-1: Add this code into web.config file

<?xml version="1.0"?>

<!--
  For more information on how to configure your ASP.NET application, please visit
  http://go.microsoft.com/fwlink/?LinkId=169433
  -->

<configuration>

    <system.web>
      <authentication mode="Windows" />
      <profile>
        <properties>
          <group name ="AuthorInfo">
            <add name="AuthorName"/>
            <add name ="age"/>
            <add name="rights"/>
              
            
          </group>

          <group name ="EditorInfo">

            <add name ="EditorName"/>
            <add name ="EditorMail"/>
            <add name ="Editorrights"/>
          </group>
          
        </properties>
      </profile>
        <compilation debug="false" targetFramework="4.0" />
    </system.web>

</configuration>

Step-2: Add this code into .aspx file
 
<%@ Page Language="C#" %>

<!DOCTYPE html PUBLIC "-//W3C//DTD XHTML 1.0 Transitional//EN" "http://www.w3.org/TR/xhtml1/DTD/xhtml1-transitional.dtd">

<script runat="server">  
    protected void Page_Load(object sender, System.EventArgs e)  
    {
        // Author Information
        Profile.AuthorInfo.AuthorName = "Rhett Butler";
        Profile.AuthorInfo.age = "30";
        Profile.AuthorInfo.rights = "Article writing";
        
        // Editor Information

        Profile.EditorInfo.EditorName = "Jacob Lefore";
        Profile.EditorInfo.EditorMail = "narenkumar851@gmail.com";
        Profile.EditorInfo.Editorrights = "full rights";


    }


    protected void Button1_Click(object sender, EventArgs e)
    {
        Label1.Text += "<b>Author Information</b><br/>";
        Label1.Text += Profile.AuthorInfo.AuthorName+"<br/>";
        Label1.Text += Profile.AuthorInfo.age + "<br/>";
        Label1.Text += Profile.AuthorInfo.rights + "<br/>";
        Label1.Text += "<b>Editor Information</b><br/>";
        Label1.Text += Profile.EditorInfo.EditorName + "<br/>";
        Label1.Text += Profile.EditorInfo.EditorMail  + "<br/>";
        Label1.Text += Profile.EditorInfo.Editorrights + "<br/>";


    }
</script>  
  
<html xmlns="http://www.w3.org/1999/xhtml">  
<head id="Head1" runat="server">  
    <title>Get Lastupdated Date</title>  
</head>  
<body>  
    <form id="form1" runat="server">  
    <div>  
        <h2>Create user Group</h2>
        <asp:Label ID="Label1" runat="server" Text=""></asp:Label>
        <br />
        <br />
        <asp:Button ID="Button1" runat="server" Text="Get user Group" 
            Width="169px" onclick="Button1_Click" />
        <br /><br />  
    </div>  
    </form>  
</body>  
</html>

Code Generate the following output

How to create and read Profile Group in ASP.NET

How to Get Last Activity Date of Profile user in ASP.NET

Step-1: Add this code into web.config file

<?xml version="1.0"?>

<!--
  For more information on how to configure your ASP.NET application, please visit
  http://go.microsoft.com/fwlink/?LinkId=169433
  -->

<configuration>

    <system.web>
      <authentication mode="Windows" />
      <profile>
        <properties>
          <add name="UserName"/>
        </properties>
      </profile>
        <compilation debug="false" targetFramework="4.0" />
    </system.web>

</configuration>

Step-2: Add this code into .aspx page (Before add this code, please create profile first )

<%@ Page Language="C#" %>

<!DOCTYPE html PUBLIC "-//W3C//DTD XHTML 1.0 Transitional//EN" "http://www.w3.org/TR/xhtml1/DTD/xhtml1-transitional.dtd">

<script runat="server">  
    protected void Page_Load(object sender, System.EventArgs e)  
    {
       
        
    }  

    protected void update_date(object sender, EventArgs e)
    {
        Label1.Text += "current Date and Time is " + DateTime.Now.ToString() +"<br/>";
        Label1.Text += "Profile LastUpdate Date is " + Profile.LastActivityDate; 


    }
</script>  
  
<html xmlns="http://www.w3.org/1999/xhtml">  
<head id="Head1" runat="server">  
    <title>Get Last Activity Date</title>  
</head>  
<body>  
    <form id="form1" runat="server">  
    <div>  
        <h2>Get Last activity Date</h2>
        <asp:Label ID="Label1" runat="server" Text=""></asp:Label>
        <br />
        <br />
        <asp:Button ID="Button1" runat="server" Text="Get Last Activity Date" 
            Width="169px" onclick="update_date" />
        <br /><br />  
    </div>  
    </form>  
</body>  
</html>
Code Generate the following output
How to Get Last Activity Date of Profile user in ASP.NET

Senin, 13 Januari 2014

How to Get Last Updated Date of Profile user in ASP.NET

Step-1: Add this code into web.config file

<?xml version="1.0"?>

<!--
  For more information on how to configure your ASP.NET application, please visit
  http://go.microsoft.com/fwlink/?LinkId=169433
  -->

<configuration>

    <system.web>
      <authentication mode="Windows" />
      <profile>
        <properties>
          <add name="UserName"/>
        </properties>
      </profile>
        <compilation debug="false" targetFramework="4.0" />
    </system.web>

</configuration>

Step-2: Add this code into .aspx page (Before add this code, please create profile first )

<%@ Page Language="C#" %>

<!DOCTYPE html PUBLIC "-//W3C//DTD XHTML 1.0 Transitional//EN" "http://www.w3.org/TR/xhtml1/DTD/xhtml1-transitional.dtd">

<script runat="server">  
    protected void Page_Load(object sender, System.EventArgs e)  
    {
       
        
    }  

    protected void update_date(object sender, EventArgs e)
    {
        Label1.Text += "current Date and Time is " + DateTime.Now.ToString() +"<br/>";
        Label1.Text += "Profile LastUpdate Date is " + Profile.LastUpdatedDate;
         

    }
</script>  
  
<html xmlns="http://www.w3.org/1999/xhtml">  
<head id="Head1" runat="server">  
    <title>Get Lastupdated Date</title>  
</head>  
<body>  
    <form id="form1" runat="server">  
    <div>  
        <h2>Last updated Date</h2>
        <asp:Label ID="Label1" runat="server" Text=""></asp:Label>
        <br />
        <br />
        <asp:Button ID="Button1" runat="server" Text="Get Last Updated Date" 
            Width="169px" onclick="update_date" />
        <br /><br />  
    </div>  
    </form>  
</body>  
</html>

Code Generate the following output

How to Get Last Updated Date of Profile user in ASP.NET

ProfileManager.DeleteProfile method delete profile in asp.net example

Step-1: Add this code in web.config file
<configuration>

    <system.web>
      <authentication mode="Windows" />
      <profile>
        <properties>
          <add name="UserName"/>
        </properties>
      </profile>
        <compilation debug="false" targetFramework="4.0" />
    </system.web>

</configuration>

Step-2: Add this code into your .aspx page

<%@ Page Language="C#" %>

<!DOCTYPE html PUBLIC "-//W3C//DTD XHTML 1.0 Transitional//EN" "http://www.w3.org/TR/xhtml1/DTD/xhtml1-transitional.dtd">

<script runat="server">  
    protected void Page_Load(object sender, System.EventArgs e)  
    {   
        if(!Page.IsPostBack)  
        {
            Profile.UserName = "Jacob Lefore";
            Profile.Save();
            Label1.Text = "Current User:" + Profile.UserName;  
        }  
    }  


    protected void DelteProfile(object sender, EventArgs e)
    {
        ProfileManager.DeleteProfile(User.Identity.Name);
        Profile.Save();
        Label1.Text = "Profile Deleted";

    }
</script>  
  
<html xmlns="http://www.w3.org/1999/xhtml">  
<head id="Head1" runat="server">  
    <title>Delete Users Profile</title>  
</head>  
<body>  
    <form id="form1" runat="server">  
    <div>  
        <h2>Delete User Profile</h2>
        <asp:Label ID="Label1" runat="server" Text=""></asp:Label>
        <br />
        <br />
        <asp:Button ID="Button1" runat="server" Text="Delete User Profile" 
            Width="169px" onclick="DelteProfile" />
        <br /><br />  
    </div>  
    </form>  
</body>  
</html>
Code generate the following output
ProfileManager.DeleteProfile method delete profile in asp.net example


Computer Programming: Web Form controls, General introduction in ASP.NET

The Web form controls are closely designed to resemble standard Visual basic Winforms controls. These controls are used for designing the interface for any Web application, for example, when you visit the website of Google, you type your search query in a TextBox, which is a control. ASP.NET provides a standard set of controls that can be used for the development of Web Applications. You can access all these controls from the ToolBox present in the Visual Studio Integrated Development Environment ( IDE ) . These controls can easily be used by just dragging and dropping them at any desired location on the Web form. Based on the tasks performed by them, these controls on the ToolBox are grouped under various categories known as tabs. For example, controls for validating the data are put under the validation tab and controls used for logging on the websites are put under the Login tab. Similarly, controls for common use are put under the standard tab and are known as standard controls . All these controls come under the Control class. All the Standard/ Web server controls are based on the WebControl class, which, in turn, is based on the control class. In other words, the WebControl class has originated from the Control class.

Later session we will discuss about the inheritance hierarchy, pubic properties, public methods, and public events of the Controls and the WebControl classes. We also get to know about the various controls such as Label, Button, TextBox, Literal, Placeholder, Hidden Field, and FileUpload that originate from the WebControl class, along with their implementations.  

Minggu, 12 Januari 2014

How to Perform Grouping of Data Matching a Criteria: SQL Programming

The database users might need to view data in a user-defined format. These reports might involve summarizing data on the basis of various criteria. SQL Server allows you to generate summarized data reports using the PIVOT clause of SELECT statement.

The PIVOT operator is used to transform a set of columns into values. PIVOT rotates a table-valued expression by turning the unique values from one column in the expression into multiple columns in the output. In addition, it also performs aggregations on the remaining column values if required in the output. Following is the syntax of PIVOT operator is:

SELECT * from table_name
PIVOT (aggregation_function (value_column)
FOR pivot_column
IN (column_list)
) table_alias

Where,

  • Table_name: name of table on which query will execute.
  • Pivot_column: the only column on which condition perform.
  • Table_alias: alias name of the table used in query only.

Consider an example, you want to display the number of purchase orders placed by certain employees, laid down with the vendors. The following query provides this report:

SELECT VendorID, [164] AS Empl, [198] AS Emp2, [223] AS Emp3, [231] AS Emp4, [233] AS Emp5 FROM
(SELECT PurchaseOrderID, EmployeeID, VendorID
FROM Purchasing.PurchaseOrderHeader) p
PIVOT
(
COUNT (PurchaseOrderID)
FOR EmployeeID IN
( [164], [198],[223], [231], [233] )
) AS pvt
ORDER BY VendorID

Following output is displayed by the preceding statements.

How to Perform Grouping of Data Matching a Criteria: SQL Programming


How to use Compute and ComputeBy Clauses in Query: SQL Programming

The COMPUTE clause, with the SELECT statement, is used to generate summary rows by using aggregate functions in the query results, in sql programming. The COMPUTE BY clause can be used to calculate summary values of the result set on a group of data. The column on which the data is to be grouped is mentioned after the BY keyword.

The GROUP BY clause is used to generate a group summary report and does not produce individual table rows in the result set, whereas the COMPUTE and COMPUTE BY clauses generate the summary report with individual data rows from the table. In other words, the COMPUTE clause is used for control-break summary reporting applications that generate detailed information in the result set.

Syntax:

SELECT column_list
FROM table_name
ORDER BY column_name
COMPUTE aggregate_function (column_name) [, aggregate_function(column_name) …]
[BY column_name [, column_name]…]

Where,

  • ORDER BY column_name specifies the name of the column(s) by which data in the result is to be sorted.
  • COMPUTE aggregate_function specifies any row aggregate function from the aggregate function list.
  • Column_name specifies the name of the column(s) for which the summary report is to be displayed.
  • BY column_name specifies the name of the column(s) by which data is to be grouped.

The following SQL query uses the COMPUTE BY clause to calculate the average sickLeaveHours and VacationHours from the Employee table and display them based on Title, VacationHours, and SickLeaveHours:

SELECT Title, 'Average VacationHours' = VacationHours, 'Average SickLeaveHours' = SickLeaveHours FROM HumanResources.Employee
WHERE Title IN ('Recruiter', 'Stocker')
ORDER BY Title, VacationHours, SickLeaveHours
COMPUTE avg(VacationHours), Avg (SickLeaveHours) BY Title

In the preceding query, the data of the VacationHours and SickLeaveHours column is grouped for the recruiter and stocker and the summation of the vacation hours and sick leave hours for both is retrieved, as shown in the following figure.

Consider another example, where you need to use the COMPUTE BY clause to calculate the subtotals of VacationHours and SickLeaveHours for each value in the Designation column. The COMPUTE clause calculates the grand total of VacationHours and SickLeaveHours:

SELECT Title, 'Total VacationHours' = VacationHours, 'Total SickLeaveHours' = SickLeaveHours
FROM HumanResources.Employee
WHERE Title IN ('Recruiter', 'Stocker')
ORDER BY Title, VacationHours, SickLeaveHours
COMPUTE sum (VacationHours), sum(SickLeaveHours) BY Title COMPUTE sum (VacationHours) , sum (SickLeaveHours)

In the preceding example, initially the data of the VacationHours and SickLeaveHours column is grouped for the recruiter and stocker and the summation of the vacation hours and sick leave hours for the recruiter and stocker.

Both these keywords are not supported in the SQL Server management studio 2012, these queries can be executed in 2008 version.

How to Create First MVC Application in Visual Studio: Introduction to MVC

MVC framework, as explained in previous article, separates your logic, views and your database of the web application. Here are simple steps to create an MVC application using Visual Studio 2013, discussed below.
  • Click on File-->New--> Project in Visual Studio (I have used VS 2013)
  • The New Project window opened with a list of categories in the left pane and some of their installed templates. Select ASP.NET MVC 4 Web Application under the Web categories.

Leave the name as is, you can change it, and click on Ok button.
  • Another window will opened which provides the options to choose the framework (by default the application may have) like empty, basic, internet or shown in the list.


  • Select Internet application and click on Ok button, it will start creating an MVC application according to your selected options. 
  • A dialog box appears to notify you about the process, after some time (depend on your system) your MVC project will create having some folders shown in the solution explorer below.

What are the uses of these folders and how they can be used by the programmer will be discussed later.

Computer Programming: Change Profile Value at runtime in asp.net with example

We already discussed about create profile for authenticated/anonymous user. This article will cover, Disable profile and save it either automatic or manually in asp.net. If you want to save profile in asp.net, follow some steps
Step-1: Add this code in web.config file
<system.web>
      <authentication mode="Windows" />
      <profile automaticSaveEnabled="false" >
        <properties>
          <add name="DOB" />          
        </properties>
      </profile>      
        <compilation debug="false" targetFramework="4.0" />
    </system.web>

Step-2: Add a web form into your project.
Step-3: First manually save some string into Profile property on Page_Load() method. Programmer can also use Profile.save() method.

Profile.DOB = "19/april/1986";
Profile.Save();

Step-4: Add  a TextBox, Button and a label Control to the Design window.
Step-5: Change Profile Property using TextBox at runtime

Default.aspx page 


<%@ Page Language="C#" %>

<!DOCTYPE html PUBLIC "-//W3C//DTD XHTML 1.0 Transitional//EN" "http://www.w3.org/TR/xhtml1/DTD/xhtml1-transitional.dtd">

<script runat="server">

    protected void Button1_Click(object sender, EventArgs e)
    {
        Profile.DOB = TextBox1.Text;
        Profile.Save();
        Label1.Text = "Update DOB is :" + Profile.DOB;
    }

    protected void Page_Load(object sender, EventArgs e)
    {
        if (!Page .IsPostBack )
        {
            Profile.DOB = "19/april/1986";
            Profile.Save();
            Label1.Text = "Your DOB is:" + Profile.DOB;
            
        }
    }
</script>

<html xmlns="http://www.w3.org/1999/xhtml">
<head runat="server">
    <title></title>
</head>
<body>
    <form id="form1" runat="server">
    <div>
    Profile Data :
        <asp:Label ID="Label1" runat="server" Text=""></asp:Label>
    
        <br />
        Enter DOB :
        <asp:TextBox ID="TextBox1" runat="server"></asp:TextBox>
        <br />
        <asp:Button ID="Button1" runat="server" onclick="Button1_Click" Text="Button" />
    
    </div>
    </form>
</body>
</html>
Code generate the following output

Computer Programming : How to save profile in asp.net
Computer Programming : Before changing the profile data

After change at runtime, Code generate the following output

Computer Programming : After changing the profile data

Computer Programming:  After change profile data


Sabtu, 11 Januari 2014

Getting Started to Build Web Applications: Introduction to MVC

MVC (Model View Controller), most usable framework for latest web programmer, enables programmer to separates their work in these three names. It is a lightweight and standard design pattern which is familiar to many web developers.

According to the name of this framework, the application divides itself in three things i.e. one contains your logic, one contains your pages (may be razor or aspx pages) and the last one will contain some classes which are used to control the pages redirecting per user clicks.

The following diagram shown about the layers of this framework which includes Business layer, display layer and input control.

Getting Started to Build Web Applications: Introduction to MVC

Model, used to represent the core of web application. To interact with database tables there are some classes have to be written. Those classes must be placed in the model folder to follow the MVC framework. It means all the logic, works for the application, falls in this category.

View, used to decide about the display of data on the pages. Mostly views uses the model data, for the validation or may be other features. When we login in to application with invalid credentials, it requires some valid entries.

Controller, used to control the display data on the views by the model. It is the middle layer of the framework, which decides about what data are to be shown from the model and of course on which view.

Microsoft described some advantages of MVC based application:
  • It makes it easier to manage complexity by dividing an application into the model, the view, and the controller.
  • It does not use view state or server-based forms. This makes the MVC framework ideal for developers who want full control over the behavior of an application.
  • It uses a Front Controller pattern that processes Web application requests through a single controller. This enables you to design an application that supports a rich routing infrastructure. For more information, see Front Controller.
  • It provides better support for test-driven development (TDD).
  • It works well for Web applications that are supported by large teams of developers and for Web designers who need a high degree of control over the application behavior.
Create First MVC Application using Visual Studio

Jumat, 10 Januari 2014

How to Perform Grouping of Data Matching a Criteria: SQL Programming

At times, you need to view data matching specific criteria to be displayed together in the result set. For example, you want to view a list of all the employees with details of employees of each department displayed together.

Grouping can be performed by following clauses:

GROUP BY

The GROUP BY clause summarizes the result set into groups as defined in the query by using aggregate functions. The HAVING clause further restricts the result set to produce the data based on a condition. The syntax of the GROUP BY clause is:

SELECT column_list
FROM table_name
WHERE condition
[GROUP BY [ALL] expression [, expression]
[HAVING search_condition]

Where,
  • ALL is a keyword used to include those groups that do not meet the search condition.
  • expression specifies the column name(s) or expression(s) on which the result set of the SELECT statement is to be grouped.
  • search_condition is the conditional expression on which the result is to be produced.
The following SQL query returns the minimum and maximum values of vacation hours for the different types of titles when the vacation hours are greater than 20:

SELECT JobTitle, Minimum = min (VacationHours), Maximum = max (VacationHours)
FROM HumanResources.Employee
WHERE VacationHours > 20 GROUP BY JobTitle

Outputs:

How to Perform Grouping of Data Matching a Criteria: SQL Programming

The GROUP BY ……..HAVING clause is same as the SELECT….WHERE clause. The result set produced with the GROUP BY clause eliminates all the records and values that do not meet the condition specified in the HAVING clause. The GROUP BY clause collects data that matches the condition, and summarizes it into an expression to produce a single value for each group. The HAVING clause eliminates all those groups that do not match the condition.

The following SQL query retrieves all the titles along with their average vacation hours when the vacation hours are more than 30 and the group average value is greater than 55:

SELECT Title, ‘Average Vacation Hours’ = avg (VacationHours) FROM HumanResources.Employee WHERE VacationHours > 30 GROUP BY Title HAVING avg (VacationHours) >55

The ALL keyword of the GROUP BY clause is used to display all groups, including those which are excluded by the WHERE clause. The ALL keyword is meaningful to those queries that contain the WHERE clause. If ALL is not used, the GROUP BY clause does not show the groups for which there are no matching rows. However, the GROUP BY ALL shows all rows, even if the groups have no rows meeting the search conditions.

The following SQL query retrieves the records for the employee titles that are eliminated in the WHERE condition:

SELECT Title, VacationHours = sum (VacationHours) FROM HumanResources.Employee WHERE Title IN (‘Recruiter’, ‘Stocker’,’Design Engineer’) GROUP BY ALL Title

How to Get Summarizing Data from Database: SQL Programming

Summary of the data contains aggregated values that help in data analysis at a broader level. For example, to analyse the sales, the users might want to view the average sales or total sales for a specified time period. The SQL Server provides aggregate functions to generate summarized data.

The users might also want to view the summarized data in different group based on specific criteria. For example, the users want to view the average sales data region-wise or product-wise. In such a case, the sales data of each region will be displayed together. You can group the data by using the GROUP BY clause of the SELECT statement. You can also use aggregate function to summarize data when grouping it.

Summarizing Data by Using Aggregate Functions

At times, you need to calculate the summarized values of a column based on a set of rows. For example, the salary of employees is stored in the Rate column of the EmployeePayHistory table and you need to calculate the average salary earned by the employees.

The aggregate functions, on execution, summarize the values for a column or a group of columns, and produce a single value. The syntax of an aggregated function is:

SELECT aggregate_function ([ALL|DISTINCT] expression) FROM table_name

Where,

  • All specifies that the aggregate function is applied to all the values in the specified column.
  • DISTINCT specifies that the aggregate function is applied to only unique values in the specified column.
  • expression specifies a column or an expression with operators.

Avg Returns the average of values on a numeric expression, either all or distinct.
Count: Returns the number of values in an expression, either all or distinct. The count function also accepts (*) as its parameter, but it counts the number of rows returned by the query.

Min Returns the lowest value in the expression. The following SQL query retrieves the minimum value from the Rate column of the EmployeePayHistory table with a user-defined heading:

SELECT ‘Minimum Rate’ = min (Rate) FROM HumanResources.EmployeePayHistory

Max Return the highest value in the expression.

Sum Returns the sum total of values in a numeric expression, either all or distinct. 

Steps to Customize the Result Set with Example: SQL Programming

SQL Server management studio needs to connect to a server to perform any query with it. The article will describe about to customize the result set using sql programming.

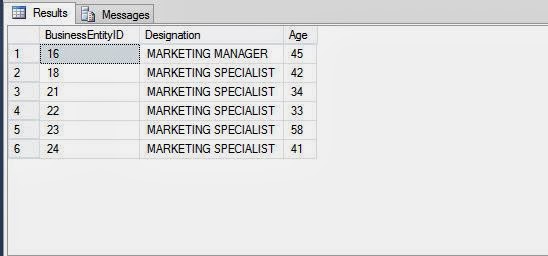
The management at Adventure Works. Inc. wants to view a report that displays the employee ID, designation, and age of the employees who are working as a marketing manager or a marketing specialist. The data should be displayed in uppercase. The employee details are stored in the Employee table in the Adventure Works database.

To solve the problem, programmer need to perform the following tasks:

Creating a Query

To display the age of the employees, you need to use the datediff function to calculate the difference between their birth date and the current date. In addition, to retrieve the data for a marketing manager or a marketing specialist, you need to use the OR logical operator.

Type the following query in the Query Editor window of the Microsoft SQL Server Management Studio window:

SELECT BusinessEntityID, upper (JobTitle) As
Designation,datediff (yy, Birthdate, getdate ( )) As Age
FROM HumanResources.Employee WHERE JobTitle='Marketing Manager'
OR JobTitle ='Marketing Specialist'

Executing the Query to Display Data

Press the F5 key or click the Execute button to execute the query and view the result set. The following figure displays the output.

Steps to Customize the Result Set with Example: SQL Programming

Kamis, 09 Januari 2014

Computer programming: create connection using provider factory,c# code

The new ADO.NET classes that allow for generic data access functionality-such as DBConnection, DbCommand, and so on -are grouped under the System.Data.Common namespace.
The first step in implementing database-agnostic data access is to use the DBProviderFactory class to create a new database provider factory object.

 DbProviderFactory factory = DbProviderFactories.GetFactory("System.Data.SqlCient");

This piece of code, because of the System.Data.SqlClient parameter passed, will have the factory object contain a SQLServer database provider factory ( the term factory generally refers to a class that builds class instances, or objects, for you). The System.Data.SqlClient string parameter is kept in a configuration file, allowing you to have c# code that really doesn't know what kind of database it's dealing with.

The database provider factory class is capable of creating a database-specific connection object through its CreateConnection method. However, you'll keep the reference to the connection object stored using the generic DbConnection reference:

 DbConnection conn = factory.CreateConnection();

The connection object will actually contain a SqlConnection object if the backend database in SQLServer, an OracleConnection if the backend database is Oracle, and so on. However, instead of working with SqlConnection or OracleConnection objects, we simply use DbConnection and let it decide at runtime what kind of object to create in the background.