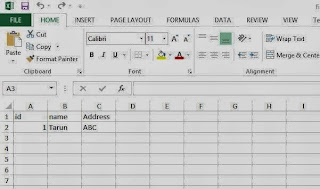
This article will cover, How to insert data into Excel spreadsheet using ASP.NET. First we need to connect Microsoft Excel workbook using the OLEDB.NET data provider. Add excel file path to connectionString. Now, your connectionstring will be look like
string connString = "Provider=Microsoft.Jet.OLEDB.4.0;" + "Data Source=" + Server.MapPath("first.xls") + ";" + "Extended Properties=Excel 4.0;";
Here, you can connect .xls file using Microsoft.Jet.OLEDB.4.0 provider also insert data in it. In Data Source, you can take .xls file path.
You can follow some steps for inserting data into excel file.
Step 1: Open Visual Studio > File > New >Website, Under Templates, click ASP.NET WebSite and choose Visual C# as the language. Select a system location and click Ok.
Step 2: We will create excel sheet and add them to the website folder. Excel sheet will be created in Office 2003(first.xls).
Step 3: Add three columns called id, name and Address to the Sheet1. Also add some data into the columns. Once this excel file is created, add it to your website folder. To add them to the solution, right click website name > Add Existing Item > Add the excel file.
Step 4: Add a web form called 'excelfile.aspx' into the website folder.
Step 5: Add a label control to the 'excelfile.aspx' page.
Step 6: Insert Data into excel file using OLEDB
Complete code is
<%@ Page Language="C#" AutoEventWireup="true" CodeFile="excelfile.aspx.cs" Inherits="excelfile" %>
<!DOCTYPE html PUBLIC "-//W3C//DTD XHTML 1.0 Transitional//EN" "http://www.w3.org/TR/xhtml1/DTD/xhtml1-transitional.dtd">
<html xmlns="http://www.w3.org/1999/xhtml">
<head runat="server">
<title></title>
</head>
<body>
<form id="form1" runat="server">
<div>
</div>
<asp:Label ID="Label1" runat="server"></asp:Label>
</form>
</body>
</html>
using System;
using System.Collections.Generic;
using System.Linq;
using System.Web;
using System.Web.UI;
using System.Web.UI.WebControls;
using System.Data.OleDb;
using System.Configuration;
using System.Data;
public partial class excelfile : System.Web.UI.Page
{
protected void Page_Load(object sender, EventArgs e)
{
string connString = "Provider=Microsoft.Jet.OLEDB.4.0;" + "Data Source=" + Server.MapPath("first.xls") + ";" + "Extended Properties=Excel 4.0;";
OleDbConnection oledbconn = new OleDbConnection(connString);
try
{
oledbconn.Open();
OleDbCommand cmd = new OleDbCommand("insert into [Sheet1$] values('2','Jacob','USA')", oledbconn);
int a= cmd.ExecuteNonQuery();
if (a>0)
{
Label1.Text = "Data Inserted";
}
}
catch (OleDbException ex)
{
Label1.Text = ex.Message;
}
finally
{
oledbconn.Close();
}
}
}


Tidak ada komentar:
Posting Komentar