Rabu, 31 Juli 2013

How to get cell value from gridview in asp.net

Computer Programming : GridView, combination of rows and columns. Single row contains one or more then one cells. If you want to get cell value from GridView, select Gridview row first. After that you can get cell value/Text from selected rows.

Step-1 : Bind GridView using SqlDataSource in ASP.NET
Step-2 : Drag and drop one label control onto design window
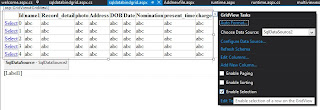
Step-3 : Select "Enable Selection" using show smart tag.


How to get cell value from gridview in asp.net


Step-4 : Double click on Gridview and handle SelectedIndexChanged event

protected void GridView1_SelectedIndexChanged(object sender, EventArgs e)
    {

    }


Step-6 : Write code for getting value from gridview cell

 protected void GridView1_SelectedIndexChanged(object sender, EventArgs e)
    {
        Label1 .Text =GridView1 .SelectedRow .Cells [2].Text ;
    }
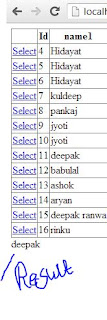
Output
How to get cell value from gridview in asp.net

Whole code
<%@ Page Language="C#" AutoEventWireup="true" CodeFile="sqldatabindgrid.aspx.cs" Inherits="sqldatabindgrid" %>

<!DOCTYPE html>

<html xmlns="http://www.w3.org/1999/xhtml">
<head runat="server">
    <title></title>
</head>
<body>
    <form id="form1" runat="server">
    <div>
 
        <asp:GridView ID="GridView1" runat="server" AutoGenerateColumns="False" DataKeyNames="Id" DataSourceID="SqlDataSource2" OnSelectedIndexChanged="GridView1_SelectedIndexChanged">
            <Columns>
                <asp:CommandField ShowSelectButton="True" />
                <asp:BoundField DataField="Id" HeaderText="Id" InsertVisible="False" ReadOnly="True" SortExpression="Id" />
                <asp:BoundField DataField="name1" HeaderText="name1" SortExpression="name1" />
                <asp:BoundField DataField="Record_detail " HeaderText="Record_detail " SortExpression="Record_detail " />
                <asp:BoundField DataField="photo" HeaderText="photo" SortExpression="photo" />
                <asp:BoundField DataField="Address" HeaderText="Address" SortExpression="Address" />
                <asp:BoundField DataField="DOB" HeaderText="DOB" SortExpression="DOB" />
                <asp:BoundField DataField="Date" HeaderText="Date" SortExpression="Date" />
                <asp:BoundField DataField="Nomination" HeaderText="Nomination" SortExpression="Nomination" />
                <asp:BoundField DataField="present_time" HeaderText="present_time" SortExpression="present_time" />
                <asp:BoundField DataField="charge" HeaderText="charge" SortExpression="charge" />
            </Columns>
        </asp:GridView>
        <asp:SqlDataSource ID="SqlDataSource2" runat="server" ConnectionString="<%$ ConnectionStrings:ConnectionString %>" SelectCommand="SELECT * FROM [crimefile]"></asp:SqlDataSource>
         
    </div>
        <asp:Label ID="Label1" runat="server"></asp:Label>
    </form>
</body>
</html>

Codebehind file
using System;
using System.Collections.Generic;
using System.Linq;
using System.Web;
using System.Web.UI;
using System.Web.UI.WebControls;

public partial class sqldatabindgrid : System.Web.UI.Page
{
    protected void Page_Load(object sender, EventArgs e)
    {

    }
    protected void GridView1_SelectedIndexChanged(object sender, EventArgs e)
    {
        Label1 .Text =GridView1 .SelectedRow .Cells [2].Text ;
    }
}
Selasa, 30 Juli 2013

How to bind GridView using SqlDataSource in ASP.NET

Step-1 : First design database table in visual studio
Step-2 : Drag and drop GridView control from ToolBox to Design window
Step-3 : Select Choose data source by show smart tag.

choose data source from show smart tag

Step-4 : Select SQL Database in Data Source Configuration wizard.
data source configuration wizard in asp.net

Step-5 : Select your database by dropdownlist in "Choose your data connection" wizard 
your connection string will appeared.

Choose your data connection

Step-6 : Select Table or Column name using "Configure the select statement"  wizard.
Configure the select statement

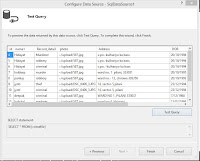
Step-7: Press Test Query button
Test your query window

Step-8: Run your Application
Bind gridview
<%@ Page Language="C#" AutoEventWireup="true" CodeFile="sqldatabindgrid.aspx.cs" Inherits="sqldatabindgrid" %>

<!DOCTYPE html>

<html xmlns="http://www.w3.org/1999/xhtml">
<head runat="server">
    <title></title>
</head>
<body>
    <form id="form1" runat="server">
    <div>
 
        <asp:GridView ID="GridView1" runat="server" AutoGenerateColumns="False" DataKeyNames="Id" DataSourceID="SqlDataSource2">
            <Columns>
                <asp:BoundField DataField="Id" HeaderText="Id" InsertVisible="False" ReadOnly="True" SortExpression="Id" />
                <asp:BoundField DataField="name1" HeaderText="name1" SortExpression="name1" />
                <asp:BoundField DataField="Record_detail " HeaderText="Record_detail " SortExpression="Record_detail " />
                <asp:BoundField DataField="photo" HeaderText="photo" SortExpression="photo" />
                <asp:BoundField DataField="Address" HeaderText="Address" SortExpression="Address" />
                <asp:BoundField DataField="DOB" HeaderText="DOB" SortExpression="DOB" />
                <asp:BoundField DataField="Date" HeaderText="Date" SortExpression="Date" />
                <asp:BoundField DataField="Nomination" HeaderText="Nomination" SortExpression="Nomination" />
                <asp:BoundField DataField="present_time" HeaderText="present_time" SortExpression="present_time" />
                <asp:BoundField DataField="charge" HeaderText="charge" SortExpression="charge" />
            </Columns>
        </asp:GridView>
        <asp:SqlDataSource ID="SqlDataSource2" runat="server" ConnectionString="<%$ ConnectionStrings:ConnectionString %>" SelectCommand="SELECT * FROM [crimefile]"></asp:SqlDataSource>
        <asp:SqlDataSource ID="SqlDataSource1" runat="server" ConnectionString="<%$ ConnectionStrings:ConnectionString %>" SelectCommand="SELECT * FROM [crimefile]"></asp:SqlDataSource>
 
    </div>
    </form>
</body>
</html>

Senin, 29 Juli 2013

Specify relative positions of controls in window form C#

When a window form is open, working normally, all the controls are set as the programmer set them with their parent form, it means that form is in normal state. Resize the form and check that the controls still remains of the same size and additional space is blank on the form.

Anchor property of the form is used to put the controls to its relative position on the form, means a control is automatically take its relative position as its parent control is resized. Each control has its four edges i.e. left, top, right and bottom. By default a control is added to the form with its Anchor property to top and left. When we resize a form then the control is still in top and left corner of the form and size of the control is fixed.

For example drag and drop a listview in the form and resize the form, the listview will not change its points of all the four edge.

Anchor property of the control in windows form C#

In the properties window change the anchor property of the listview to “Top, Bottom, Left, Right”, run the form and check the difference.

Anchor property of controls in windows forms C#

This is how we have specify the relative position of the control from designer part. We can set this anchor property through code behind file

listView1.Anchor = AnchorStyles.Left | AnchorStyles.Top | AnchorStyles.Right | AnchorStyles.Bottom;

Anchor property and dock property are mutually exclusive, means one can be set at a time. The last property change will be effective in both of these two.

How to change Theme Dynamically using QueryString in ASP.NET

Introduction About Theme
Using theme you can change your page look or design.Themes define the style properties of a web page . Now, let's explore the elements of themes , such as skins, Cascading Style Sheets (CSS), and images. A skin is a file with the .skin extension that contains property settings for individual controls, such as Button, Textbox, or Label. You can either define skins for each control in different skin files or define skins for all the controls in a single file. The skin files with the .skin extension are created inside the subfolder of the App_Themes folder in the Solution Explorer window of a website.
<%@ Page Language="C#" AutoEventWireup="true" CodeFile="runtime.aspx.cs" Inherits="runtime" %>

<!DOCTYPE html>

<html xmlns="http://www.w3.org/1999/xhtml">
<head runat="server">
    <title></title>
</head>
<body>
    <form id="form1" runat="server">
    <div>
        <asp:DropDownList ID="DropDownList1" runat="server" Height="54px" OnSelectedIndexChanged="DropDownList1_SelectedIndexChanged" Width="208px" AutoPostBack="True">
            <asp:ListItem>Select Theme</asp:ListItem>
            <asp:ListItem>Red</asp:ListItem>
            <asp:ListItem>Green</asp:ListItem>
        </asp:DropDownList>
    </div>
    </form>
</body>
</html>

Codebehind

using System;
using System.Collections.Generic;
using System.Linq;
using System.Web;
using System.Web.UI;
using System.Web.UI.WebControls;

public partial class runtime : System.Web.UI.Page
{  
    protected void Page_PreInit(Object sender, EventArgs e)
    {
        if (Request.QueryString["Theme"] != null)
        {
            Page.Theme = Request.QueryString["Theme"].ToString();
        }
     
    }
    protected void Page_Load(object sender, EventArgs e)
    {
        DropDownList1.AutoPostBack = true;

    }
    protected void DropDownList1_SelectedIndexChanged(object sender, EventArgs e)
    {      
            Response.Redirect("~/runtime.aspx?Theme=" + DropDownList1.SelectedValue);
     
        DropDownList1.AutoPostBack = false;
     

    }
}
Output
How to change theme using dropdownlist

How to change theme using dropdownlist

Minggu, 28 Juli 2013

How to use MultiView and View Control in ASP.NET

The MultiView Control
The MultiView control is a container for a group of view controls . It allows you to define a group of View controls , where each View control contains child controls . Your application can then render a specific View control based on specific criteria , such as user identity, user preferences, and information passed in a querystring parameter. The MultiView control is also used to create wizard . To allow user to navigate between View controls within a MultiView control, you can add a LinkButton or Button control to each View control.

Public properties of the MultiView Class
ActiveViewIndex : Obtains or set the index value of the active View control within a MultiView control.
EnableTheming : Obtains or sets a value showing whether themes apply to the MultiView control.
Views : Obtains the collections of view controls in the MultiView control.

Public Methods of the MultiView Class
GetActiveView : Obtains the current active View control within a MultiView control.
setActiveView : Sets the specified View control to the active view within a MultiView control.

Public Event of the MultiView Class
ActiveViewChnaged : Raised when the active View control of a multiView control changes between posts to the server.

The View Control 
The view control is a container for a group of controls . A View control must always be stored within a MultiView control. Only one View control can be defined as the active view within a MultiView control at a time. A view control can contain any type of controls, including other MultiView controls. A View control does not support any style properties . To apply styles to a View Control , You have to add one or more panel controls to the View controls. To allow users to navigate between multiple View controls within a MultiView control , you can add a LinkButton or Button control to each View Control.

Public Properties of the View Class
EnableTheming : Obtains or sets a value showing if themes apply to this controls or not.
Visible : Obtains or sets a value which indicates whether the  View control is visible.


<%@ Page Language="C#" %>

<!DOCTYPE html>

<script runat="server">

    protected void Button1_Click(object sender, EventArgs e)
    {
        MultiView1.Visible = true;
        MultiView1.SetActiveView(View1);
    }

    protected void Button2_Click(object sender, EventArgs e)
    {
        MultiView1.Visible = true;
        MultiView1.SetActiveView(View2);
    }
</script>

<html xmlns="http://www.w3.org/1999/xhtml">
<head runat="server">
    <title></title>
    <style type="text/css">
        .auto-style1 {
            font-size: larger;
        }
    </style>
</head>
<body>
    <form id="form1" runat="server">
        <strong><span class="auto-style1">Select Buttons for birthday gift </span></strong>

    <div>
 
        <asp:Button ID="Button1" runat="server" Text="Gift 1" OnClick="Button1_Click" />&nbsp;
        <asp:Button ID="Button2" runat="server" Text="Gift 2" OnClick="Button2_Click" />
 
        <br />
        <asp:MultiView ID="MultiView1" runat="server" ActiveViewIndex ="0" Visible ="false">
            <asp:View ID="View1" runat ="server">
                <asp:Image ID="Image1" runat="server" Height="165px" ImageUrl="~/picture/images.jpg" Width="194px" />

            </asp:View>
            <asp:View ID="View2" runat ="server" >
                <asp:Image ID="Image2" runat="server" Height="165px" ImageUrl="~/picture/motorola droid.jpg" Width="191px" />

            </asp:View>
        </asp:MultiView>
 
    </div>
    </form>
</body>
</html>


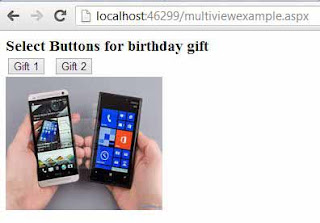
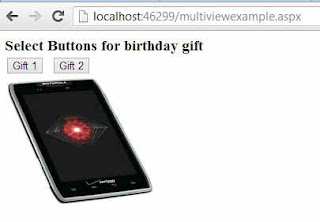
Output
How to use MultiView and View Control in ASP.NET

How to use MultiView and View Control in ASP.NET

How to create a page of resolution 1024x768

Steps for creating resolution 1024x768
Step-1: Add a new Webform name as "Pageresolution.aspx" using Solution explorer.
Step-2: Add new Stylesheet page name as "StyleSheet.css" using Solution explorer.
Step-3: Add some class in StyleSheet.css file.

body {
   background-color : green ;


}
.page {
    background-color :white ;
    margin : 0px auto 0px auto ;
    width : 1024px;
}
Step-4 : Open "Pageresolution.aspx" page in source mode
Step-5 : Drag and drop your "Stylesheet.css" file from solution explorer into <head> tag

<head runat="server">
    <title>page resolution 1024x768</title>
    <link href="StyleSheet.css" rel="stylesheet" />
</head>
Step-6: Add class in <div> tag after <form> tag


   <form id="form1" runat="server">
    <div class ="page">
 
    </div>
    </form>
Step-7 : Now open  "Pageresolution.aspx" in Design mode
your page look like this
How to create a page of resolution 1024x768

Sabtu, 27 Juli 2013

ListView in windows forms C#

A ListView class displays a list of items with options of text, small and large images. If we look in our windows explorer of windows 8 and view menu in windows 7, there is a view tab in Quick Access Toolbar that have some listview’s options e.g. small icons, large icons, details, tiles etc. We can use the listview control to display data from our database or a text file.

The ListView class often used to display the collection of items in one of these five different views: Small icon, large icon, Tile, List and Details. Small icon and large icon view are simple to understand as items will be displayed as small icon, or large icon in the listview.  Tile view will display item and its subitems as a tile that contains a text information and a large icon. Details view will display item and its subitems in a grid with column headers that shows the information about that item. View List is well known to us as i.e. all the items are shown in a single list.

There are many properties of a listview control. In this post we will go through some most often used properties in C# programming.

  • AllowColumnReorder: user can reorder columns in details view using this property with dragging column headers.
  • CheckBoxes: checkboxes are displayed for each item to allow the user to check the items they want to work on.
  • Columns: get the list of column headers of listview. Only used in details view.
  • GridLines: enable or disable gridlines around the items and subitems. Only used in details view.
  • Scrollable: it shows the scroll bar if there are more items to be fit in client area.
  • TileSize: decide the size of the tile in Tile view.
  • TopItem: used to get or set the first visible item.
  • View: specify how items will be shown according to one of above five different views.

There are more properties of listview which can be easily used with their name in properties window of Visual Studio.

Let’s drag and drop a ListView control in windows form and add following items and finally view these items as large icons. This code is in C# language.
listView1.Items.Add("Item 1");
listView1.Items.Add("Item 2");
listView1.Items.Add("Item 3");
listView1.Items.Add("Item 4");
listView1.Items.Add("Item 5");
when we run this form then it will show the items as:

ListView large icon view

When we want to talk about to show the items in details view then we have to add some columns into this listview. If we will set the details view with above listview items then it will show nothing when we run this form. That’s why there should be some columns to use the details view in listview control. This code is in C# language.

listView1.Columns.Add("column1");
listView1.Columns.Add("column2");
listView1.Columns.Add("column3");

listView1.Items.Add(new ListViewItem(new[] { "value1", "value1", "value1" }));
listView1.Items.Add(new ListViewItem(new[] { "value2", "value2", "value2" }));
listView1.Items.Add(new ListViewItem(new[] { "value3", "value3", "value3" }));

Run this form now then it will show three columns as shown in below screenshot:

ListView details view

We can change some common options at design time as shown in below screenshot:
ListView design time editing

As the properties of listview class there are some events of listview class which occurred when something happens to listview. The most often used event is SelectedIndexChanged that occurs whenever the selected index property of the listview changed. The example of this event is:
private void listView1_SelectedIndexChanged(object sender, EventArgs e)
{
MessageBox.Show("SelectedIndexChanged event occur");
}
Now every time you change the selected index of listview this message will show in Message Box.

Jumat, 26 Juli 2013

How to Change file attributes in C# Programming

File attributes are metadata associated with computer files that define system behaviour.  Same as files, folders, volumes and other file system objects may have these attributes. All the operating system have often four attributes i.e. archive, hidden, read-only and system. Windows has more attributes. Read more about File Attributes

User have to right click on desired file or folder and then open properties, to change the attributes of that file or folder. If one want to change attributes of multiple files then he/she has to either select all the files and then change or change attributes of each file or folder one by one.

In programming context we can do this task with a predefined class i.e. FileAttributes which provides all the attributes for files and directories. We can easily change the desired attribute of a file or directory using the above class FileAttributes that is exists in System.IO namespace.

Design a new form in windows form application that will look like the below form:


Change file attributes in C#

There are some controls which are used for specific task in this project, we will discuss them one by one:
  • TextBox: show the path of folder selected by user.
  • Browse Button: open a folderBrowserDialog which select a path of folders and files.
  • CheckBox: if checked program will check all the sub-folders for files.
Except these controls there are three more buttons which are used to play with attributes of files or folders as their text shows. For example "Remove all" will remove all the attributes of files and folder at selected path.

Write the following code in the click event of Only Hidden button:
private void btnSetHidden_Click(object sender, EventArgs e)
        {
            count = 0;
            setHidden(txtPath.Text);
            lblStatus.Text = "Number Of Scanned Files And Folders:" + count.ToString();
        }
In the above code there is an integer variable count that will count the scanned file and folders. Then it will call a function setHidden(string ) that will use the selected path and set the hidden property to true of all the files and folders at that selected path.


The code of this function is:
private void setHidden(string dir)
{
if (!Directory.Exists(dir))
{
lblStatus.Text = "Invalid path!";
return;
}
if (chkSub.Checked)
{
foreach (string d in System.IO.Directory.GetDirectories(dir))
{
count++;
lblStatus.Text = dir;
setHidden(d);
DirectoryInfo df = new DirectoryInfo(d);

df.Attributes = System.IO.FileAttributes.Hidden;
foreach (string fil in System.IO.Directory.GetFiles(d))
{
FileInfo f = new FileInfo(fil);
f.Attributes = System.IO.FileAttributes.Hidden;
Application.DoEvents();
count++;
}
}
}
}
In above code it will change the attribute of a directory and then all the files in that directory. Here, a new Method doEvents() is used which process all windows messages currently in the message queue. Calling this method causes the current thread to be suspended while all waiting window messages are processed. You can read more about DoEvents().

Go for example.

How to use CustomValidator control in ASP.NET

Introduction
The CustomValidator control is used to customize and implement data validation as per your requirement. Occasionally, You might need to validate your data in a way that is not possible directly with the help of existing the Validation controls. For example , if you want to find out whether a number is odd or even , you cannot use an existing validation control for doing that because this functionality is not included in any of the Validation controls. To solve this problem , you need a Validation control that can be customized to solve this problem. The CustomValidator control exists within the System.Web.UI.WebControls namespace. The CustomValidator control checks whether or not the input you have given, such as prime, even, or odd number, matches a given condition.

Public Properties of the CustomValidator Class:
ClientValidationFunction : Obtains or sets the name of the custom client-side script function used for validation.
ValidateEmptyText : Obtains or sets s Boolean value indicating whether empty text should be validated or not.


<%@ Page Language="C#" AutoEventWireup="true" CodeFile="logincontrol.aspx.cs" Inherits="logincontrol" %>
<!DOCTYPE html>
<html xmlns="http://www.w3.org/1999/xhtml">
<head runat="server">
    <title></title>
</head>
<body>
    <form id="form1" runat="server">
    <div>  
        Enter number :
        <asp:TextBox ID="TextBox1" runat="server" Height="19px" Width="234px"></asp:TextBox>
&nbsp;<asp:CustomValidator ID="CustomValidator1" runat="server" ControlToValidate="TextBox1" ErrorMessage="CustomValidator" OnServerValidate="CustomValidator1_ServerValidate"></asp:CustomValidator>
        <br />
        <asp:Button ID="Button1" runat="server" OnClick="Button1_Click" Text="Submit" />
        <br />  
    </div>
    </form>
</body>
</html>
Code-Behind file


using System;
using System.Collections.Generic;
using System.Linq;
using System.Web;
using System.Web.UI;
using System.Web.UI.WebControls;
public partial class logincontrol : System.Web.UI.Page
{    protected void Page_Load(object sender, EventArgs e)
    {
        }
    protected void Button1_Click(object sender, EventArgs e)
    {
    }
    protected void CustomValidator1_ServerValidate(object source, ServerValidateEventArgs args)
    {
        if (Convert.ToInt32(args.Value) % 2 == 0)
        {
            Response.Write("even number");

        }
        else
        {
            Response.Write("odd number");
        }
    }
}

Rabu, 24 Juli 2013

Example of AutoComplete Type property of TextBox Control in ASP.NET

Obtains or sets a value that indicates the AutoComplete behavior of the TextBox control.
Introduction
AutoComplete means your textbox control should filled automatically after given some word or letter into your textbox. Suppose you have a email input textbox on your browser screen and this textbox automatically  filled after giving some words or letter.
Lets take an Example:
<%@ Page Language="C#" %>
<!DOCTYPE html>
<script runat="server">
</script>
<html xmlns="http://www.w3.org/1999/xhtml">
<head runat="server">
    <title></title>
</head>
<body>
    <form id="form1" runat="server">
    <div>
        <asp:TextBox ID="TextBox1" runat="server" AutoCompleteType="Email" Height="26px" Width="270px"></asp:TextBox>
    </div>
    </form>
</body>
</html>
Output
Example of AutoComplete Type property of TextBox Control in ASP.NET

In this example we set email as a AutoCompleteType property of the textbox control. In above image you can see when we enter "n" letter into the textbox then a popup appear bellow to the textbox with having email id which start  letter "n".

If you want to disable your AutoComplete property of the TextBox control then set Disabled value. 
you can set for  Re-Type password ,  Email -conformation etc. 


Selasa, 23 Juli 2013

How to make comment box in ASP.NET

Basically CommentBox shows list of data. So we can use repeater control for this types of application.The Basic logic behind of this application is.

  • Feed your user data to database table first
  • Show data from database table using repeater control.
Introduction on repeater control
The Repeater control is a data bound control that is used to display repeated list of items from the associated data source. It is a single WebControl that allows splitting markup tags across the templates . The Repeater control does not provide support to in-Built layout or styles . Therefore, While working with the repeater control you have to explicitly declare all layout  , formatting , and style. In other words , The Repeater control does not support built-in selection or editing features.

Create database Table

Make Stored procedure 
CREATE PROCEDURE insrtdata

AS
select * from commentbox

RETURN 0


<%@ Page Language="C#" %>
<!DOCTYPE html>
<script runat="server">
    protected void Page_Load(object sender, EventArgs e)
    {
     
            System.Data.SqlClient.SqlConnection con = new System.Data.SqlClient.SqlConnection();
            con.ConnectionString = ConfigurationManager.ConnectionStrings["ConnectionString"].ToString();
            con.Open();
            System.Data.SqlClient.SqlCommand cmd = new System.Data.SqlClient.SqlCommand();
            cmd.CommandText = "insrtdata";
            cmd.CommandType = System.Data.CommandType.StoredProcedure;
            cmd.Connection = con;
            System.Data.SqlClient.SqlDataAdapter da = new System.Data.SqlClient.SqlDataAdapter(cmd);
            System.Data.DataSet ds = new System.Data.DataSet();
            da.Fill(ds);
            Repeater1.DataSource = ds;
            Repeater1.DataBind();        
    }

    protected void Button1_Click(object sender, EventArgs e)
    {
        System.Data.SqlClient.SqlConnection con = new System.Data.SqlClient.SqlConnection();
        con.ConnectionString = ConfigurationManager.ConnectionStrings["ConnectionString"].ToString();
        con.Open();
        System.Data.SqlClient.SqlCommand cmd = new System.Data.SqlClient.SqlCommand();
        cmd.Parameters.AddWithValue("@na",nametxt .Text);
        cmd.Parameters.AddWithValue("@em",emailtxt .Text);
        cmd.Parameters.AddWithValue("@web",webtxt .Text);
        cmd.Parameters.AddWithValue("@con",contenttxt .Text);
        cmd.CommandText = "insert into [commentbox](Name,Email,Website,Content)values(@na,@em,@web,@con)";
        cmd.Connection = con;
        cmd.ExecuteNonQuery();
     

    }
</script>

<html xmlns="http://www.w3.org/1999/xhtml">
<head runat="server">
    <title></title>
</head>
<body>
    <form id="form1" runat="server">
    <div>
 
        Your Comment:<br />
        Name :&nbsp;&nbsp;
        <asp:TextBox ID="nametxt" runat="server" Height="24px" Width="231px"></asp:TextBox>
        <br />
        <br />
        Email :&nbsp;&nbsp;&nbsp; <asp:TextBox ID="emailtxt" runat="server" Height="23px" Width="230px"></asp:TextBox>
        <br />
        <br />
        Website:
        <asp:TextBox ID="webtxt" runat="server" Height="23px" Width="230px"></asp:TextBox>
        <br />
        <br />
        Content :
        <asp:TextBox ID="contenttxt" runat="server" Rows="5" TextMode="MultiLine"></asp:TextBox>
        <br />
        <br />
        <asp:Button ID="Button1" runat="server" OnClick="Button1_Click" Text="Submit " />
 
    </div>
        <asp:Repeater ID="Repeater1" runat="server">
         
            <ItemTemplate>
                <hr />
             
                    <div style="background-color: #CCCC00">
Welcome,<asp:Label ID="Label1" runat="server" Text='<%# Eval("Name") %>'></asp:Label>
                        <asp:Label ID="Label2" runat="server" Text='<%# Eval("Email") %>'></asp:Label>
                    </div>
           
                <div style="background-color: #3399FF">
                    <asp:Literal ID="lit" runat ="server" Text ='<%# Eval("Content") %>' Mode ="Transform" />
                    <br />
                    <asp:HyperLink ID="HyperLink1" runat="server" NavigateUrl ='<%# Eval("Website") %>' Text ='<%# Eval("Website") %>' />
                      </div></ItemTemplate>
        </asp:Repeater>
    </form>
</body>
</html>

Output
How to make comment box in ASP.NET

Senin, 22 Juli 2013

How to prevent duplicate child forms in windows forms C#

In my previous post we have create an MDI container form in which we have opened some individual forms called child forms. Each form contains a property MdiParent that is used to get or set the parent form of a particular form.
Form2 obj = new Form2();
obj.MdiParent = this;
obj.Show();

As we know, in MDI container application user opens multiple child forms at a time. Most often when user opens a child form, application opens a new instance of the form, doesn't matter the form is previously opened or not. This is programmer’s job to check if the same form is previously opened then bring that form to front otherwise create a new instance.

To check the instance is null or not we have to write following code in our code behind file of form that will be the child form.
private static Form3 instance;
public static Form3 GetInstance()
{
if (instance == null)
instance = new Form3 ();
return instance;
}

In above code we have defined a new object of type Form3. Each time when we call this method it will check this object whether it is null or not. If this is null it will create a new instance of the form otherwise it simply return that object.

Our next task is to set the value of that instance to null each time user closes that form. Each form has a FormClosing event which occur whenever user closes the form, before the form will closed. We will set the instance to null in this FormClosing event of the form.
Instance = null;

In the MDI parent form replace the above three line of code with the following code:
Form3 obj = Form3.GetInstance();
obj.MdiParent = this;

if (!obj.Visible)
obj.Show();
else
obj.BringToFront();

Through the above code we will use the newly defined method i.e. GetInstance() in place of its constructor. Now when user opens this child form it will check that if that form is visible then it will bring that in front otherwise display the form to user using show method.

Minggu, 21 Juli 2013

Filter data in datagridview according to combobox in c#

As we have previously studied that datagridview is used for display rows and columns of data in a grid format in windows form. Mostly data are previously defined which are to be shown in datagridview. Sometimes we have to change the data on basis of some conditions.

In previous post we have learnt to bind a datagridview with search option and in else case all the data from database will bind to datagridview in C# language. In this post we will learn to bind datagridview with the selected index changed event of combobox in C#.

The selection changed event of combobox occurs when the value of selected index property changes. We are going to change our data of datagridview according to that changed value.

Let’s create a student class, which will be used to bind our datagridview, having some properties like below:
public class Student
{
public string Name { get; set; }
public int Age { get; set; }
public string Address { get; set; }
public string Branch { get; set; }
}

Create a new list of student that will be the data source of datagridview and insert some records in that list having branch CS or IT as I have inserted in my example using C# language. Set this list as a data source of datagridview.
dataGridView1.DataSource = studentList;

Now when we run this project all the records will be shown in datagridview. We want to change the data of datagridview according to selection changed event. So write the below code in selection changed event of combobox
if (comboBox1.SelectedItem != null)
{
string branch = comboBox1.Text;
var students = studentList.Where(a => a.Branch.Equals(branch));
dataGridView1.DataSource = students.ToList();
}

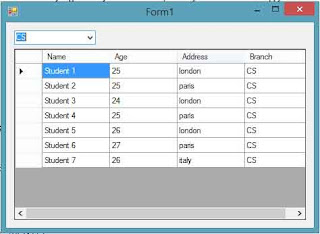
Run this project now and change the selection value of combobox to CS and we will show the data of datagridview have been changed as following image:

Filter data in datagridview according to combobox in c#

Change the selection value to IT and the data will be changed as following image:


Filter data in datagridview according to combobox in c#
Go for example

How to use TextBox control in ASP.NET

Introduction

The TextBox control is an input control , which allows you to enter text. The TextBox control exists within the System.Web.UI.WebControls namespace.
You can set the style of the TextBox by using the TextMode property . By default , the TextMode property is set to SingleLine to create a single-line HTML . text field but it can also be set to MultiLine for a multiline textbox.
You can convert a mode of TextBox control to a Password control, where the text, which the user types is masked with special symbols such as asterisks (*).
The display width of a textbox is set with its columns property and if it is a multiline textbox , the display height is set with the Rows property.

Public Properties of the TextBox Classes
AutoCompleteType : Obtains or sets a value that indicates the AutoComplete behavior of the TextBox control.
AutoPostBack : Obtains or sets a value that indicates whether an automatic postback to the server occurs when the TextBox control loses focus.
CausesValidation : Obtains or sets a value indicating whether validation is performed when the textbox control is set to validate when a postback occurs.
Columns : Obtains or set the display width of the textbox in characters.
MaxLength : Obtains or sets the maximum number of characters allowed in the textbox.
ReadOnly : Obtains or sets a value indicating whether the contents of the TextBox control can be changed.
Rows : Obtains or sets the number of rows displayed in a multiline textbox.
Text : Obtains or sets the text content of the TextBox control.
TextMode : Obtains or sets the behavior mode (single-line , multiline or password) of the TextBox control.
ValidationGroup : Obtains or sets the group of controls for which the TextBox control causes validation when it postback to the server.
Wrap : Obtains or sets a value indicating whether the text content wraps within a multiline textbox.

Public Event of the TextBox Class
TextChanged : Occurs when the user changes the text of the TextBox.


Example of the TextBox Control

<%@ Page Language="C#" %>
<!DOCTYPE html>
<script runat="server">
    protected void Button1_Click(object sender, EventArgs e)
    {
        TextBox1.Text = " this is the single line textbox";
        TextBox2.Text = " this is the multi-line text box having 10 rows.";
        TextBox4.Text = TextBox3.Text;
    }
</script>

<html xmlns="http://www.w3.org/1999/xhtml">
<head runat="server">
    <title></title>
</head>
<body>
    <form id="form1" runat="server">
    <div>
 
        <asp:Label ID="Label1" runat="server" style="font-weight: 700" Text="Different types of TextBox control"></asp:Label>
        <br />
        <br />
        <asp:Button ID="Button1" runat="server" OnClick="Button1_Click" Text="Click me" />
        <br />
        <br />
        <asp:TextBox ID="TextBox1" runat="server" Height="27px" Width="220px"></asp:TextBox>
        <br />
        <br />
        <asp:TextBox ID="TextBox2" runat="server" Rows="10" TextMode="MultiLine"></asp:TextBox>
        <br />
        <br />
        <asp:Label ID="Label2" runat="server" style="font-weight: 700" Text="Enter Password"></asp:Label>
        <br />
        <asp:TextBox ID="TextBox3" runat="server" Height="23px" TextMode="Password" Width="211px"></asp:TextBox>
        <br />
        <br />
        <asp:TextBox ID="TextBox4" runat="server" Height="23px" Width="206px"></asp:TextBox>
 
    </div>
    </form>
</body>
</html>

Jumat, 19 Juli 2013

ASP PROGRAM : How to use Wizard Control in ASP.NET

ASP PROGRAM : Introduction
The wizard control provides navigation and a User Interface (UI) to collect related data across multiple steps. It also allows you to implement liner or non-linear navigation through the steps such as skipping unnecessary steps or returning to a previously completed step to change some value. The appearance of the wizard control is fully customized by using templates , skins and style settings; for example , you can use the HeaderTemplate , SideBarTemplate, StartNavigationTemplate , FinishNavigationTemplate , and StepNavigationTemplate properties to customized the interface of the Wizard control.

Public Properties of the Wizard Class
ActiveStep : Obtains the step in the WizardSteps collection , which is currently displayed to the end-user
ActiveStepIndex : Obtains or sets the index value of the current WizardStepBase object.
CancelButtonImageUrl : Obtains or sets the URL of the image displayed for the cancel button.
CancelButtonStyle : Obtains a reference to a collection of style properties that describes the appearance of the cancel button .
CancelButtonText : Obtains or sets the text caption that is displayed for the cancel button.
CancelButtonType : Obtains or sets the type of button that is rendered as the cancel button.
CancelDestinationPageUrl : Obtains or sets the URL that the end user is directed to when they click the cancel button.
CellPadding : Obtains or sets the amount of space between the data of the cell and the cell border.
CellSpacing : Obtains or sets the space between the cells
DisplayCancelButton : Obtains or sets a boolean value showing whether to display a cancel button.
DisplaySideBar : Obtains or sets a Boolean value showing whether to display the sidebar area on the wizard control.

Example of Wizard Control 

When you add a Wizard control on a Web page (Default.aspx), it adds the following code to the source code of the web page
<asp:Wizard ID="Wizard1" runat="server" ActiveStepIndex="0">
            <WizardSteps>
                <asp:WizardStep runat="server" title="Step 1">
                </asp:WizardStep>
                <asp:WizardStep runat="server" title="Step 2">
                </asp:WizardStep>
            </WizardSteps>
        </asp:Wizard>
If you want to add some controls to the Wizard control then you must drop some controls between opening and closing tag of WizardStep

<asp:WizardStep runat="server" title="Step 1">
//Put some controls here
                </asp:WizardStep>
<%@ Page Language="C#" %>

<!DOCTYPE html>

<script runat="server">

    protected void Page_Load(object sender, EventArgs e)
    {

    }

    protected void RadioButtonList1_SelectedIndexChanged(object sender, EventArgs e)
    {
     
            result.Text = "your gender are <br/>" + RadioButtonList1.SelectedItem.Text;
   
    }
</script>

<html xmlns="http://www.w3.org/1999/xhtml">
<head runat="server">
    <title></title>
</head>
<body>
    <form id="form1" runat="server">
    <div>
 
        <asp:Wizard ID="Wizard1" runat="server" ActiveStepIndex="0">
            <WizardSteps>
                <asp:WizardStep runat="server" title="Step 1">
                    Your Gender are<br />
                    <asp:RadioButtonList ID="RadioButtonList1" runat="server" AutoPostBack="True" OnSelectedIndexChanged="RadioButtonList1_SelectedIndexChanged">
                        <asp:ListItem>Male</asp:ListItem>
                        <asp:ListItem>Female</asp:ListItem>
                    </asp:RadioButtonList>
                    <br />
                    <asp:Label ID="result" runat="server"></asp:Label>
                </asp:WizardStep>
                <asp:WizardStep runat="server" title="Step 2">
                    Welcome
                </asp:WizardStep>
            </WizardSteps>
        </asp:Wizard>
 
    </div>
    </form>
</body>
</html>


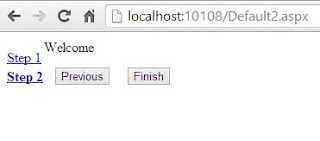
Output
ASP PROGRAM : How to use Wizard Control in ASP.NET

ASP PROGRAM : How to use Wizard Control in ASP.NET

Kamis, 18 Juli 2013

How to Bind Bulleted List using XMLDataSource in ASP.NET


Related Post

<%@ Page Language="C#" %>
<!DOCTYPE html>
<script runat="server">
</script>
<html xmlns="http://www.w3.org/1999/xhtml">
<head runat="server">
    <title></title>
</head>
<body>
    <form id="form1" runat="server">
    <div>
   
        <asp:BulletedList ID="BulletedList1" runat="server" DataSourceID="XmlDataSource1" DataTextField="Text" DataValueField="url" DisplayMode="HyperLink">
        </asp:BulletedList>
        <asp:XmlDataSource ID="XmlDataSource1" runat="server" DataFile="~/database/adver.xml"></asp:XmlDataSource>
   
    </div>
    </form>
</body>
</html>
Output
Bind Bulleted list using xmldata source in asp.net
 

How to use ImageControl in ASP.NET

Related Post


Introduction 
The Image control is standard Web Server control, which is used to display an image on a Web page. This control exists within the System.Web.UI.WebControl namespace. You set the Uniform resource Locator (URL) of the image with the ImageUrl property of the Image control. The alignment of the image in relation to other elements on the Web page is specified by setting the ImageAlign property.

Public properties of the image Class
AlternateText : Obtains or sets the alternate text displayed in the image control when the image is not available . Browsers that support the ToolTips featurs display this text as a tooltip.
DescriptionUrl : Obtains or sets the location to a detailed description for the image.
Enabled : Obtains or sets a value indicating whether the control is enabled.
Font : Obtains or sets the font properties for the text associated with the control.
GenerateEmptyAlternateText : Obtains or sets a value indicating whether the control generates an alternate text attribute for an empty string value.
ImageAlign : Obtains or sets the alignment of the image control in relation to other controls on the Web page.

ImageUrl : Obtains or sets the location of an image to where it display in the Image control.

Example of Image control in asp.net

First insert image in any folder or root folder of the website

ImageControl example in asp.net

<%@ Page Language="C#" %>

<!DOCTYPE html>

<script runat="server">

</script>

<html xmlns="http://www.w3.org/1999/xhtml">
<head runat="server">
    <title></title>
</head>
<body>
    <form id="form1" runat="server">
    <div>
        <asp:Image ID="Image1" runat="server" ImageUrl ="~/Img/images.jpg" />
    </div>
    </form>
</body>
</html>

How to use TextChanged event in ASP.NET

Note : Event occurs only when the AutoPostBack property of the control is set to true.
 Example of TextChanged event of the TextBox when AutoPostBack property is set to true.
<%@ Page Language="C#" %>
<!DOCTYPE html>
<script runat="server">
    protected void TextBox2_TextChanged(object sender, EventArgs e)
    {
        int a = Convert.ToInt32(TextBox1.Text);
        int b = Convert.ToInt32(TextBox2.Text);
        int c = a + b;
        TextBox3.Text = Convert.ToString(c);
      
    }
</script>
<html xmlns="http://www.w3.org/1999/xhtml">
<head runat="server">
    <title></title>
</head>
<body>
    <form id="form1" runat="server">
    <div>
  
        Enter first number:<asp:TextBox ID="TextBox1" runat="server"></asp:TextBox>
        <br />
        Enter Second Number :
        <asp:TextBox ID="TextBox2" runat="server" OnTextChanged="TextBox2_TextChanged" AutoPostBack="True"></asp:TextBox>
        <br />
        Total : <asp:TextBox ID="TextBox3" runat="server"></asp:TextBox>
  
    </div>
    </form>
</body>
</html>
Output
first enter any number into first Textbox after press TAB key 
and enter second number again press TAB key , Your result will show after pressing tab key.
 
TextChanged Event of the textbox class
 

Rabu, 17 Juli 2013

How to use Hyperlink control in ASP.NET

Related Post:
Introduction
The HyperLink control is used to create a link to another Web page that can be a page in your Web application. or anywhere else on the World Wide Web (www) . The HyperLink control exists within the System.Web.UI.WebControls namespace.
You can specify the location of the linked page by specifying its URL on the current page . You can use text as well as an image in the HyperLink control. Text is specified with the Text Property and image is specified by the ImageUrl property . By default , when you click a Hyperlink control , the Hyperlinked content appears in a new browser window. You can set the Target property to the name of a window or frame , as linked in blow

Target property Options of the HyperLink class
_blank : Displays the hyperlinked content in a new window without frames.
_parent : Displays the Hyperlinked content in the immediate frameset parent
_self : Displays the Hyperlinked content in the frame with focus.
_top : Displays the Hyperlinked content in the full window without frames.

Public Properties of the HyperLink Class
ImageUrl : Obtains the path to an image to be displayed for the HyperLink control.
NavigateUrl : Obtains the URL to link to the Web page when the HyperLink control is clicked.
Target : Obtains the target window to display the Web page data when the HyperLink control is clicked.
Text : Obtains the text caption for the HyperLink control 

Example of Hyperlink control in ASP.NET  


    <%@ Page Language="C#" %>
    <!DOCTYPE html>
    <script runat="server">
    </script>
    <html xmlns="http://www.w3.org/1999/xhtml">
    <head runat="server">
        <title></title>
    </head>
    <body>
        <form id="form1" runat="server">
        <div>
            <asp:HyperLink Target ="_blank" ID="HyperLink1" runat="server" NavigateUrl ="http://www.id-script.com"> Worldbest programming blog on blogspot</asp:HyperLink>
        </div>
        </form>
    </body>
    </html>
    Output 
    How to use hyperlink control in asp.net