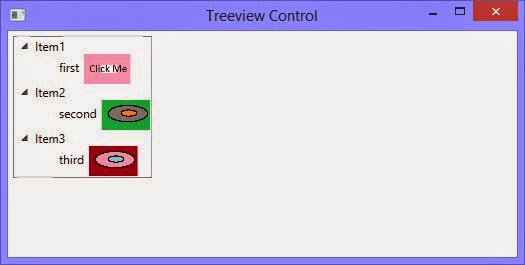
Image control can be placed in any other control such like Treeview, Toolbar control or any other controls. The images can be stored in your solution files. To place an image in Treeview control using following simple steps.
Place a stackpanel with horizontal orientation and look like following structure:
The XAML code will place a label and an image in a stack panel. Now to use this in treeview control just place it in between the treeview item code.
A single treeview item will be placed in the WPF window. Now write the following code to place three treeview items each having an image:
Run the project and expand each of the node of treeview, each node have its label and an image as shown in the following image:
See Also: Place an Image in Toolbar
Place a stackpanel with horizontal orientation and look like following structure:
<StackPanel Orientation="Horizontal" Height="30">
<Label Content="first"></Label>
<Image Source="buttonImage.png"></Image>
</StackPanel>
<Label Content="first"></Label>
<Image Source="buttonImage.png"></Image>
</StackPanel>
The XAML code will place a label and an image in a stack panel. Now to use this in treeview control just place it in between the treeview item code.
<TreeView HorizontalAlignment="Left" VerticalAlignment="Top" Margin="5">
<TreeViewItem Header="Item1">
<StackPanel Orientation="Horizontal" Height="30">
<Label Content="first"></Label>
<Image Source="buttonImage.png"></Image>
</StackPanel>
</TreeViewItem>
</TreeView>
<TreeViewItem Header="Item1">
<StackPanel Orientation="Horizontal" Height="30">
<Label Content="first"></Label>
<Image Source="buttonImage.png"></Image>
</StackPanel>
</TreeViewItem>
</TreeView>
A single treeview item will be placed in the WPF window. Now write the following code to place three treeview items each having an image:
<TreeView HorizontalAlignment="Left" VerticalAlignment="Top" Margin="5">
<TreeViewItem Header="Item1">
<StackPanel Orientation="Horizontal" Height="30">
<Label Content="first"></Label>
<Image Source="buttonImage.png"></Image>
</StackPanel>
</TreeViewItem>
<TreeViewItem Header="Item2">
<StackPanel Orientation="Horizontal" Height="30">
<Label Content="second"></Label>
<Image Source="image1.png"></Image>
</StackPanel>
</TreeViewItem>
<TreeViewItem Header="Item3">
<StackPanel Orientation="Horizontal" Height="30">
<Label Content="third"></Label>
<Image Source="image2.png"></Image>
</StackPanel>
</TreeViewItem>
</TreeView>
Run the project and expand each of the node of treeview, each node have its label and an image as shown in the following image:
See Also: Place an Image in Toolbar

Tidak ada komentar:
Posting Komentar